Jiffy with Kubernetes
Overview
We will create and deploy a sample jiffy application in Kubernetes using the preconfigured minikube cluster. The containerized jiffy application will be deployed in the Kubernetes cluster and will communicate with a Postgres database and KVS running on the cluster-host’s network. In this example the Postgres database and KVS will not be running in containers.
The goal of this example is to get a feel for Kubernetes deployment of a jiffy-application. This tutorial should not be considered as a roadmap for productive Kubernetes deployments, but as a starting point for getting a jiffy application running in Kubernetes.
We will see how to deploy the containerized application into a Kubernetes Node, how to view the Pod logs, how to scale the deployment up/down and how to log into a Pod. For the most part, we will use the Kubernetes minikube default cluster values.
Steps
- Verify the Jiffy installation.
- Generate a new application using a sample model file from the Jiffy source-tree.
- Edit the application’s configuration file for Postgres and Docker use.
- Statically compile a binary for inclusion in the Docker image.
- Write a simple Dockerfile to create a runnable image.
- Write a small script to update the image’s .dev.config.json file with the container’s ipv4 address.
- Create a container from the image and start the container.
- Test access to the application running in the container using Postman.
- Install the minikube Kubernetes cluster.
- Create a Kubernetes deployment of the containerized jiffy application.
- Expose the jiffy application deployment as a Kubernetes Service.
- Detect the IP/port that minikube is using to expose the new Kubernetes Service.
- Run some tests against the Kubernetes Deployment of the jiffy application using Postman.
- Scale the deployment up and down.
- View the logs of the Pods running in the minikube cluster.
- Login to a Pod running an instance of the jiffy application and take a look around.
- Shutdown the Kubernetes Service.
- Remove the Kubernetes Deployment of the jiffy application.
- Cleanup the Docker environment.
Verify Jiffy Installation
Ensure that Jiffy has been installed on your workstation by following the instructions provided in the Jiffy Installation section.
Generate the Application
We will generate a new application called libappK8 from a model file that contains a ‘Library’ and ‘Book’ entity. Two relationships are maintained in the model; a Library hasMany Books and a Book belongsTo a specific Library. An application generated from this model will allow many Jiffy application features to be tested.
Open a terminal window on your workstation and run jiffy using the Library-Book model file to generate the source-code for our test application as follows:
jiffy -m $GOPATH/src/github.com/1414C/jiffy/support/testing_models/hasManyBelongsTo.json -p /exp/libappk8
Remember that jiffys -p flag expects to be provided with an existing path underneath your $GOPATH/src folder. In the example invocation shown above, jiffy will create the libappk8 folder underneath $GOPATH/src/exp/ and then write the generated source-code to this location.
Execution of the generator (jiffy) should result in output similar to:
2018/07/03 21:34:47 generated: /Users/stevem/gowork/src/exp/libappk8/models/librarym.go
2018/07/03 21:34:47 generated: /Users/stevem/gowork/src/exp/libappk8/models/librarym_ext.go
2018/07/03 21:34:47 generated: /Users/stevem/gowork/src/exp/libappk8/controllers/libraryc.go
...
...
...
2018/07/03 21:34:49 executing /usr/local/go/bin/goimports -w /Users/stevem/gowork/src/exp/libappk8/util/strings.go
2018/07/03 21:34:49 executing /usr/local/go/bin/gofmt -w /Users/stevem/gowork/src/exp/libappk8/util/strings.go
2018/07/03 21:34:49 executing /usr/local/go/bin/goimports -w /Users/stevem/gowork/src/exp/libappk8/appobj/appconf.go
2018/07/03 21:34:49 executing /usr/local/go/bin/gofmt -w /Users/stevem/gowork/src/exp/libappk8/appobj/appconf.go
Your output may look slightly different, particularly the database connection test which will almost certainly fail. This is nothing to be concerned about, as the generator is attempting to connect to a local Postgres instance using bad credentials.
Edit the Application Configuration File
Update Address Keys
The next step is to edit the generated application’s configuration files. Docker allocates a static ip-address for each container by default, and we will use that address in our application’s configuration file. ‘external_address’ refers to the address at which the application’s end-points will be available, while the ‘internal_address’ is used for cache updates and interprocess communication over web-socket connections.
Open the generated .dev.config.json file in an editor and update the ‘external_address’ and ‘internal_address’ values with “xxx.xxx.xxx.xxx:8080” and “xxx.xxx.xxx.xxx:4444” respectively. Using an illegal ipv4 address as a placeholder/mask ensures that the container will not start in the event that the container’s address could not be assigned to the config keys. When you have finished, save the file after verifying that it looks like this:
.dev.config.json

{
    "external_address": "xxx.xxx.xxx.xxx:8080",
    "internal_address": "xxx.xxx.xxx.xxx:4444",
    "env": "dev",
    ...
    ...

}
Update Application’s Database Config
Jiffy generates configuration files targeting a Postgres database by default. Maintain the values in the ‘database’ block of the *.dev.config.json; file as necessary in order to gain access to your testing database:
.dev.config.json

{
    ...
    "database": {
        "db_dialect": "postgres",
        "host":       "192.168.1.65",
        "port":       5432,
        "usr":        "godev",
        "password":   "gogogo123",
        "name":       "glrestgen"
    },
    ...
}
Once the database block in .dev.config.json has been updated, save the file and close the editor.
Ensure PostgreSQL is Available
By default, Postgres only allows connections from the localhost (127.0.0.1). If your Postgres database is running on another machine, you will need to ensure that it allows connections from remote hosts. A quick web-search will reveal how to maintain Postgres’s postgresql.conf and pg_hba.conf files to allow remote connections to the database. Make sure that you are able to connect to your Postgres database (use psql) from the Docker host environment before continuing.
Update the Application’s Group Leader KVS Config
Jiffy generates configuration files supporting a stand-alone / local group-leadership KVS by default. When running more than one application instance, a group-leadership KVS is required in order for each group-member to obtain the group-leader information on start-up. This example will make use of the sluggo KVS. Examine the ‘group_leader_kvs’ block in *.config.json to ensure the ‘sluggo’ KVS option is active as shown below:
.dev.config.json

{
    ...
    "group_leader_kvs": {
        "local_standalone": {
            "active": false,
            "internal_address": "127.0.0.1:4444"
        },
        "redis": {
            "active": false,
            "max_idle": 80,
            "max_active": 12000,
            "redis_protocol": "tcp",
            "redis_address": "127.0.0.1:6379"
        },
        "memcached": {
            "active": false,
            "memcached_addresses": [
                "192.168.112.50:11211"
            ]
        },
        "sluggo": {
            "active": true,
            "sluggo_address": "192.168.111.24:7070"
        }
    },
    ...
}
Ensure that a single instance of sluggo is running on a system accessible to the deployed containers.
Build a Static Application Binary for Alpine Linux
Next, we need to build a static application binary for linux/amd64. To build the application, a number of dependencies are required as outlined in the Jiffy Dependencies section of the documentation. Check that your build environment contains the correct packages and import any that are missing.
This tutorial uses the popular Alpine Linux distribution as the basis for the new container image. Alpine Linux is a small and sparse distribution making it nice for use with containers. There are a few things to be aware of however…
Alpine Linux is based on lib-musl which means that binaries built by go build where the source makes use of cgo must target lib-musl rather than lib-gcc. The binary resulting from the typical ‘GOOS=linux GOARCH=amd64 go build -o main .’ command would almost certainly not work on Alpine. The good news it is quite easy to build with musl-gcc, the bad news is that musl-gcc is available for Linux only. If you are working on a system in which lib-musl is not supported, you will need to run the go build command in a supported build environment. Most Linux distributions and architectures are supported.
Check if lib-musl has been installed in the build environment by running the which command:
which musl-gcc
If musl-gcc was found in the $PATH, which will return output similar to:
/usr/bin/musl-gcc
If musl-gcc was not found, follow the installation instructions below to download and install the required packages.
Install Musl-gcc
We will go over how to install musl-gcc on a Debian system, but the steps are largely the same for any Linux distribution. Use your distribution’s package manager to install the musl lib, musl development files and musl development tools. Run the following commands (or their equivalents) in a terminal window on your Linux build system:
sudo apt-get update
sudo apt-get install musl
sudo apt-get install musl-dev
sudo apt-get install musl-tools
Check to make sure that musl-gcc is now in the $PATH:
which musl-gcc
Build a Static Application Binary
After ensuring that all of the required dependencies have been installed in the build environment, run the following command to build a statically-linked binary called main for the Alpine Linux target OS. Setting the CC environment variable to point at musl-gcc ensures that the target (executable) will run in the Alpine Linux environment. Adjust the GOARCH environment variable as necessary:
CGO=0 GOOS=linux GOARCH=amd64 CC=$(which musl-gcc) go build --ldflags '-w -linkmode external -extldflags "-static"' -a -v -tags netgo -installsuffix cgo -o main .
Running go build with CGO=0 and setting the -a flag forces a rebuild without cross-compilation dependencies. Setting –ldflags as shown instructs go build to produce a statically linked binary. Setting the CC environment variable to point at musl-gcc ensures that the target (executable) will run in the Alpine Linux environment. Once the build has completed, a new ‘main’ file will have been created. Check the file via the file command:
file main
You should see output similar to:
main: ELF 64-bit LSB executable, x86-64, version 1 (SYSV), statically linked, not stripped
Build a Dynamically-Linked Application Binary
This is optional and will produce a marginally smaller binary. We will not use a dynamically-linked binary in our image, but have included a suitable go build command for reference purposes.
CGO=0 GOOS=linux GOARCH=amd64 CC=$(which musl-gcc) go build -a -tags netgo -installsuffix cgo -o main .
Running go build with CGO=0 and setting the -a flag forces a rebuild without cross-compilation dependencies. go build produces dynamically-linked binaries by default, so no linker instructions have been provided. Setting the CC environment variable to point at musl-gcc ensures that the target (executable) will run in the Alpine Linux environment. Once the build has completed, a new ‘main’ file will have been created. Check the file via the file command:
file main
You should see output similar to:
main: ELF 64-bit LSB executable, x86-64, version 1 (SYSV), dynamically linked, interpreter /lib/ld-musl-x86_64.so.1, not stripped
Create a Dockerfile
Verify that you have Docker installed in your build environment. The easiest way to do this is to run which docker in a terminal window to ensure the docker application is in the \$PATH. If there is no response, check the $PATH or install Docker following the instructions at www.docker.com. Verify that the Docker daemon is running by opening a terminal window in your build environment and running the docker ps command. If Docker is not running, an error message will be displayed. Start the Docker daemon before continuing.
In order to deploy the compiled application in a Docker container, we need to create a Dockerfile. The docker build command uses the Dockerfile as a set of instructions when building an image. As mentioned previously, we will use Alpine Linux as the foundation (base image) for the new Docker container image. Dockerhub has a number of pre-defined images that are available to be ‘pulled’ into locally defined custom images.
Create a new file called Dockerfile in the root folder of the libappK8 source-tree and open it in your editor. Copy the following content into the new Dockerfile. An effort has been made to briefly describe what each line of the Dockerfile is used for.
# use the official docker hub alpine:latest base image
FROM alpine:latest

# set the maintainer information for the new image
LABEL maintainer="<stevem@1414c.io>"

# add the compiled application binary to the root folder of the new image
ADD main ./

# set permissions on main
RUN /bin/chmod 755 main

# copy the configuration file to the root folder of the new image
COPY .dev.config.json .

# add the entrypoint.sh shell script to the root folder of the new image
ADD docker-entrypoint.sh .

# set widely exectuable permission on the shell-script
RUN /bin/chmod 777 docker-entrypoint.sh

# create a directory in the root folder of the new image to hold the jwt signing keys
RUN mkdir jwtkeys

# copy the jwtkeys folder content into the image's /jwtkeys folder
COPY jwtkeys ./jwtkeys

# set container environment variable $PORT to 8080
ENV PORT 8080

# container will listen on port tcp/8080
EXPOSE 8080

# container will listen on port ws/4444
EXPOSE 4444

# update local package list
RUN apk update

# add unix file command
RUN apk add file

# add openssh-client for connectivity testing
RUN apk add openssh-client

# add the postgresql-client to test connectivity to the db
RUN apk add postgresql-client

ENTRYPOINT ["/docker-entrypoint.sh"]

CMD ["-dev"]
Create the Entrypoint Script
In a previous step .dev.config.json was updated with xxx.xxx.xxx.xxx ipv4 address masks. In order to replace the masks with the container’s ipv4 address, docker run and docker start will execute the docker-entrypoint.sh when running a container instance based on the image definition. At the moment this is a problem however, as we have not written the script yet. Create a new file called docker-entrypoint.sh in the root folder of the libappK8 source-tree and open it in your editor. Copy the following content into the new docker-entrypoint.sh file:
#!/bin/sh

# get the ipv4 address assigned to eth0
replace=$(ifconfig eth0 | grep "inet addr" | cut -d ':' -f 2 | cut -d ' ' -f 1)

# set a variable with the value we are planning to replace
search="xxx.xxx.xxx.xxx"

# check that variable replace has something in it
if [ -z "$replace" ]; then
  echo "Did not get an address value for eth0"
elif [ -n "$replace" ]; then
  echo "${replace} found"
# replace all instances of 'xxx.xxx.xxx.xxx' in .dev.config.json
# with the ipv4 address in the ${replace} variable
  sed -i "s/${search}/${replace}/g" .dev.config.json
  exec /main "$@"
fi
Note that the docker-entrypoint.sh script assumes the ipv4 address should be read from the eth0 interface. This may not be the case in more complex deployments.
Build the Image
Assuming the previous steps have been successful, it is now time to build the new Docker image. Execute the following command from the libappk8 root folder:
docker build -t libappk8 .
Running docker build as shown instructs Docker to construct an image called libappk8 using the Dockerfile in the current working directory. You should see output similar to:
Aardvark:libappk8 stevem$ docker build -t libappk8 .
Sending build context to Docker daemon   14.4MB
Step 1/18 : FROM alpine:3.7
 ---> 3fd9065eaf02
Step 2/18 : LABEL maintainer="<stevem@1414c.io>"
 ---> Using cache
 ---> a89002eee29a
Step 3/18 : ADD main ./
 ---> Using cache
 ---> 8b9bc986eeaf
Step 4/18 : RUN /bin/chmod 755 main
 ---> Using cache
 ---> 28d71ce7dab5
Step 5/18 : COPY .dev.config.json .
 ---> 8e328fa89f48
Step 6/18 : ADD docker-entrypoint.sh .
 ---> 03cdb6d936c9
Step 7/18 : RUN /bin/chmod 777 docker-entrypoint.sh
 ---> Running in 531609e3a043
Removing intermediate container 531609e3a043
 ---> 8ec421877ec1
Step 8/18 : RUN mkdir jwtkeys
 ---> Running in b27591bd3191
Removing intermediate container b27591bd3191
 ---> 4e55e01097c9
Step 9/18 : COPY jwtkeys ./jwtkeys
 ---> e211c1e1ccee
Step 10/18 : ENV PORT 8080
 ---> Running in fa89a88ebcf4
Removing intermediate container fa89a88ebcf4
 ---> 416f504d58e1
Step 11/18 : EXPOSE 8080
 ---> Running in 66c2aef3a443
Removing intermediate container 66c2aef3a443
 ---> 6f3157466a72
Step 12/18 : EXPOSE 4444
 ---> Running in 673d4bbef1f1
Removing intermediate container 673d4bbef1f1
 ---> ac7734dd11c3
Step 13/18 : RUN apk update
 ---> Running in 7e3b73167c88
fetch http://dl-cdn.alpinelinux.org/alpine/v3.7/main/x86_64/APKINDEX.tar.gz
fetch http://dl-cdn.alpinelinux.org/alpine/v3.7/community/x86_64/APKINDEX.tar.gz
v3.7.0-215-g16971064c0 [http://dl-cdn.alpinelinux.org/alpine/v3.7/main]
v3.7.0-207-gac61833f9b [http://dl-cdn.alpinelinux.org/alpine/v3.7/community]
OK: 9054 distinct packages available
Removing intermediate container 7e3b73167c88
 ---> 367ea4588fb7
Step 14/18 : RUN apk add file
 ---> Running in 785efc041757
(1/2) Installing libmagic (5.32-r0)
(2/2) Installing file (5.32-r0)
Executing busybox-1.27.2-r7.trigger
OK: 9 MiB in 13 packages
Removing intermediate container 785efc041757
 ---> fdd43aa7687f
Step 15/18 : RUN apk add openssh-client
 ---> Running in 324ae2c9b8c3
(1/2) Installing openssh-keygen (7.5_p1-r8)
(2/2) Installing openssh-client (7.5_p1-r8)
Executing busybox-1.27.2-r7.trigger
OK: 12 MiB in 15 packages
Removing intermediate container 324ae2c9b8c3
 ---> 583336db3bff
Step 16/18 : RUN apk add postgresql-client
 ---> Running in 5c16c83775fc
(1/9) Installing ncurses-terminfo-base (6.0_p20171125-r0)
(2/9) Installing ncurses-terminfo (6.0_p20171125-r0)
(3/9) Installing ncurses-libs (6.0_p20171125-r0)
(4/9) Installing libedit (20170329.3.1-r3)
(5/9) Installing db (5.3.28-r0)
(6/9) Installing libsasl (2.1.26-r11)
(7/9) Installing libldap (2.4.45-r3)
(8/9) Installing libpq (10.4-r0)
(9/9) Installing postgresql-client (10.4-r0)
Executing busybox-1.27.2-r7.trigger
OK: 24 MiB in 24 packages
Removing intermediate container 5c16c83775fc
 ---> 73960ab81e46
Step 17/18 : ENTRYPOINT ["/docker-entrypoint.sh"]
 ---> Running in 90236136ec8c
Removing intermediate container 90236136ec8c
 ---> 960766571b87
Step 18/18 : CMD ["-dev"]
 ---> Running in 60e5203ffd61
Removing intermediate container 60e5203ffd61
 ---> c952825021e9
Successfully built c952825021e9
Successfully tagged libappk8:latest
Aardvark:libappK8 stevem$
View the Image
You can run the docker image command as shown below to view some basic data regarding the new image:
docker image ls libappk8
You should see output similar to:
 REPOSITORY          TAG                 IMAGE ID            CREATED                  SIZE
 libappk8            latest              c952825021e9        Less than a second ago   48.8MB
Use the Image
Once the image has been created, the next step is to use it to create a container. This can be done in a single step where Docker creates the container and then starts it. Run the following command to create and start a new container from the libappk8 image:
docker run --rm --name libappk8 -p 8080:8080 -d libappk8
Calling docker run with the –rm flag instructs Docker to delete the container when it is stopped. Jiffy application containers should be considered throwaway under normal operating conditions. Execution of docker run should create, start and detach the libappk8 container.
If all went well, docker created a container from the libappk8 image and then started it. The flags provided with the docker run command do the following:
- –rm - remove (delete) the container after it is stopped
- –name - the image to create the container from
- -p - used to bind the host’s tcp/8080 port to container port tcp/8080
- -d - detach the container from the starting session
Check the Container Status
Container status can be checked via the docker ps command:
docker ps -a
Resulting in output similar to:
CONTAINER ID        IMAGE               COMMAND                  CREATED                  STATUS                    PORTS                              NAMES
7d99554e46dd        libappk8            "/docker-entrypoint.…"   Less than a second ago   Up 2 minutes              4444/tcp, 0.0.0.0:8080->8080/tcp   libappk8
The output of the command shows that the libappk8 container was started with entrypoint ‘/docker-entrypoint.sh -dev’ and that container port :8080 is mapped to host port :8080.
SSH into the Container
We can ssh into the running container to see what is going on using the command shown in the following terminal session. The command logs in as root using the specified interactive shell (in this case /bin/sh). Check that ‘main -dev’ is running as expected using the Linux ps command.
docker exec -it libappk8 /bin/sh
ps -ef shows that ‘main -dev’ is running:
  / # ps -ef
  PID   USER     TIME   COMMAND
      1 root       0:00 /main -dev
     22 root       0:00 /bin/sh
     30 root       0:00 ps -ef
  / #
Take a look around the in the container environment and verify that the content of .dev.config.json has been updated with the correct ip-address using the ifconfig/cat commands. Remember that in this use-case the docker container is created with a static ipv4 address assigned to the eth0 interface. Verify that the eth0 ipv4 address has been added to the ‘external_address’ and ‘internal_address’ keys in .dev.config.json.
/ # ifconfig
eth0      Link encap:Ethernet  HWaddr 02:42:AC:11:00:02
          inet addr:172.17.0.2  Bcast:172.17.255.255  Mask:255.255.0.0
          UP BROADCAST RUNNING MULTICAST  MTU:1500  Metric:1
          RX packets:1173 errors:0 dropped:0 overruns:0 frame:0
          TX packets:887 errors:0 dropped:0 overruns:0 carrier:0
          collisions:0 txqueuelen:0
          RX bytes:117699 (114.9 KiB)  TX bytes:65147 (63.6 KiB)

lo        Link encap:Local Loopback
          inet addr:127.0.0.1  Mask:255.0.0.0
          UP LOOPBACK RUNNING  MTU:65536  Metric:1
          RX packets:8058 errors:0 dropped:0 overruns:0 frame:0
          TX packets:8058 errors:0 dropped:0 overruns:0 carrier:0
          collisions:0 txqueuelen:1
          RX bytes:1409323 (1.3 MiB)  TX bytes:1409323 (1.3 MiB)

/ # cat .dev.config.json
{
    "external_address": "172.17.0.2:8080",
    "internal_address": "172.17.0.2:4444",
    "env": "dev",
    ...
    ...
    ...
            "service_name":   "Book",
            "service_active": true
        }
        ]
}/ #
Use the psql Client to Connect to Postgres
We installed the Postgres client package into the libappk8 image by including it in our Dockerfile. Make sure that the libappk8 container is running and that you have logged in via the docker exec -it libappk8 /bin/sh command. Try to connect to your Postgres database as follows:
/ # psql -h 192.168.1.65 -d postgres -U postgres
Password for user postgres: *******************
psql (10.4, server 9.5.3)
Type "help" for help.

postgres=#
Connecting to the database using psql is just for demonstration purposes. If the database was not reachable the container would not have started. For a discussion of what to do if the container entrypoint fails, see the Troubleshooting section of this document.
Login to the Application
Launch Postman or your favorite RESTful service testing tool and specify a target URL of: http://172.17.0.2:8080/usr/login making sure to select the http POST method. Maintain the request body to provide a user-id and password as shown in the following JSON snippet. Typically the user-id for a Jiffy application is an email address, but an exception is made for the default administration user definition.
    {
        "email": "admin",
        "password": "initpass"
    }
When you have finished and your Postman (or other test utility) looks like the following image, click the ‘Send’ button to post your login request to the running application.

If all goes well, you will get a http response code of 200 (status ok), and a block of JSON with a single ‘token’ tag containing a jumble of letters and numbers. This is the JWT that will be used to validate the ‘admin’ user’s authorization to access the ‘Library’ and ‘Book’ entity service end-points. If you want to read more about JWT’s, jwt.io is a good place to start, or you can refer to the Access Control section of this document set.

Create a Library
We will create a new ‘Library’ entity. Configure your test-tool to POST to the ‘library’ service as shown in the following image:

Copy the JWT from the login session and paste it into the new POST request’s Authorization header field as shown below and then submit the request to the application.

Following submission, a new ‘Library’ entity should have been created:

Stop the Docker Container
Now that we have verified that the containerized application runs in the Docker environment, stop the container as follows:
docker stop libappk8
Install Minikube
Kubernetes offers a preconfigured single node cluster called Minikube which is designed to allow developers to test deployments. Minikube is lightweight and will easily run on a workstation or laptop. Install Minikube and kubectl following the instructions at install-minikube. Minikube and kubectl are required in order to follow along with the tutorial.
Verify Minikube Installation
Once you have installed minikube and kubectl the cluster must be started and kubectl needs to be told to use the minikube context. From the command-prompt run the following commands:
minikube start
  kubectl config use-context minikube
  kubectl cluster-info
If there are any errors, go back to the install-minikube instructions and work through the issues before continuing. If all went well, you should see output similar to:
  Kubernetes master is running at https://192.168.64.2:8443
  KubeDNS is running at https://192.168.64.2:8443/api/v1/namespaces/kube-system/services/kube-dns:dns/proxy

  To further debug and diagnose cluster problems, use 'kubectl cluster-info dump'.
Open the Kubernetes Dashboard
Use of the Kubernetes dashboard is not required, but it does make things easier to understand. The tutorial will make use of and refer the dashboard from this point forward. Run the following command to open the Kubernetes dashboard in your default browser:
nminikube dashboard
The dashboard should open in your default browser as shown below. Note that it can take some time for the dashboard to become available. If your browser opens but is not able to connect to the dashboard, wait a bit and then refresh the browser session. The dashboard will should become available after a short delay.
Deploy the Application in Kubernetes
Now that the minikube cluster is running and the Kubernetes dashboard has been launched, it is time to deploy the libappk8 application. We will create a single instance deployment of the application using the kubectl command. Kubernetes expects to pull images from an image repository, however in this example we will be working with a local image instead. kubectl requires that locally pulled images conform to a `image_name:image_version’ where the version is not equal to ‘latest’. For this reason, we will build a new image with version :v1.
Remove the existing libappk8 image via the docker image rm command, then use eval to tell Docker to build a new image in the Minikube environment. Finally run docker build to create a new image (libappk8:v1) for deployment:
See this link for a discussion of using local Docker images with Minikube.
  docker image rm libappk8*
  eval $(minikube docker-env)
  docker build -t libappk8:v1 .
Once the new Docker image has been created, run the following kubectl command to create a new single instance deployment called libappk8:
kubectl run libappk8 --image=libappk8:v1 --replicas=1 --port=8080
Execution of the kubectl run command should result in the following:
Aardvark:libappk8 stevem$ kubectl run libappk8 --image=libappk8:v1 --replicas=1 --port=8080
deployment.apps "libappk8" created
Aardvark:libappk8 stevem$
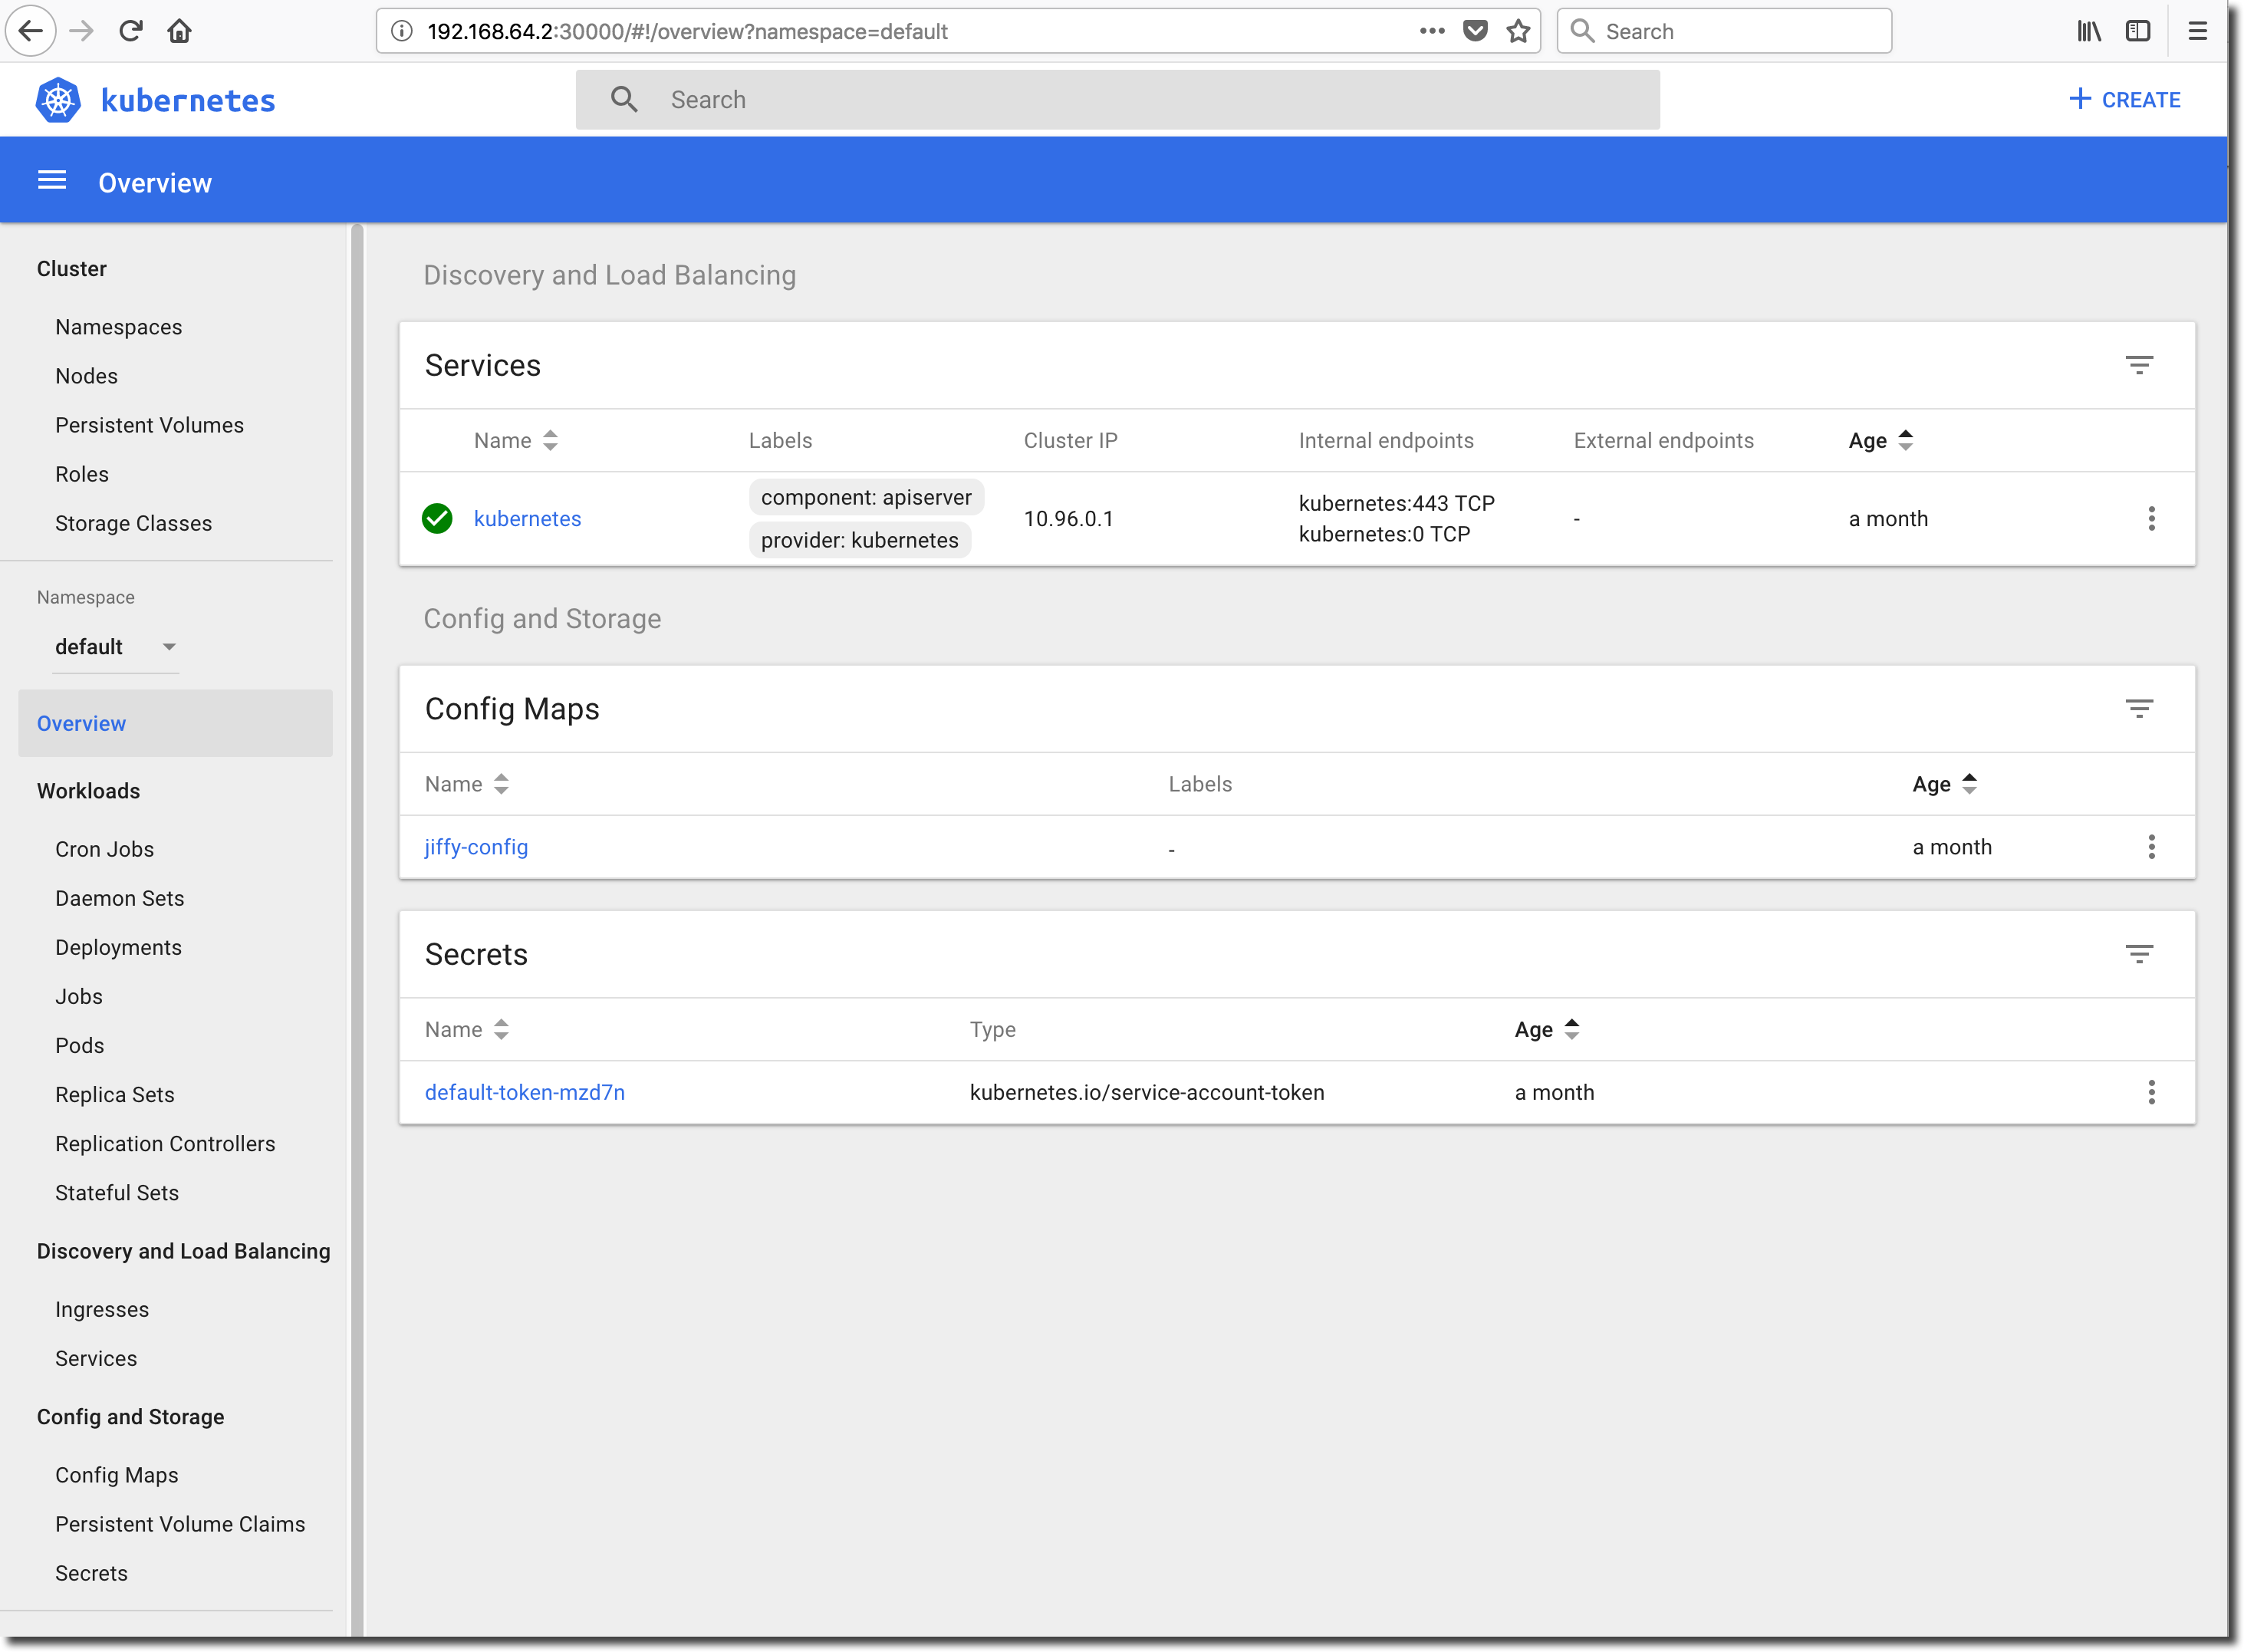
Go to the dashboard session running in the browser and click on ‘Overview’ in the menubar located on the left-side of the screen. You should see that a new Deployment called ‘libappk8’ has been created from image libappk8:v1. The Deployment should be running a single Pod (application instance) and everything should be green.
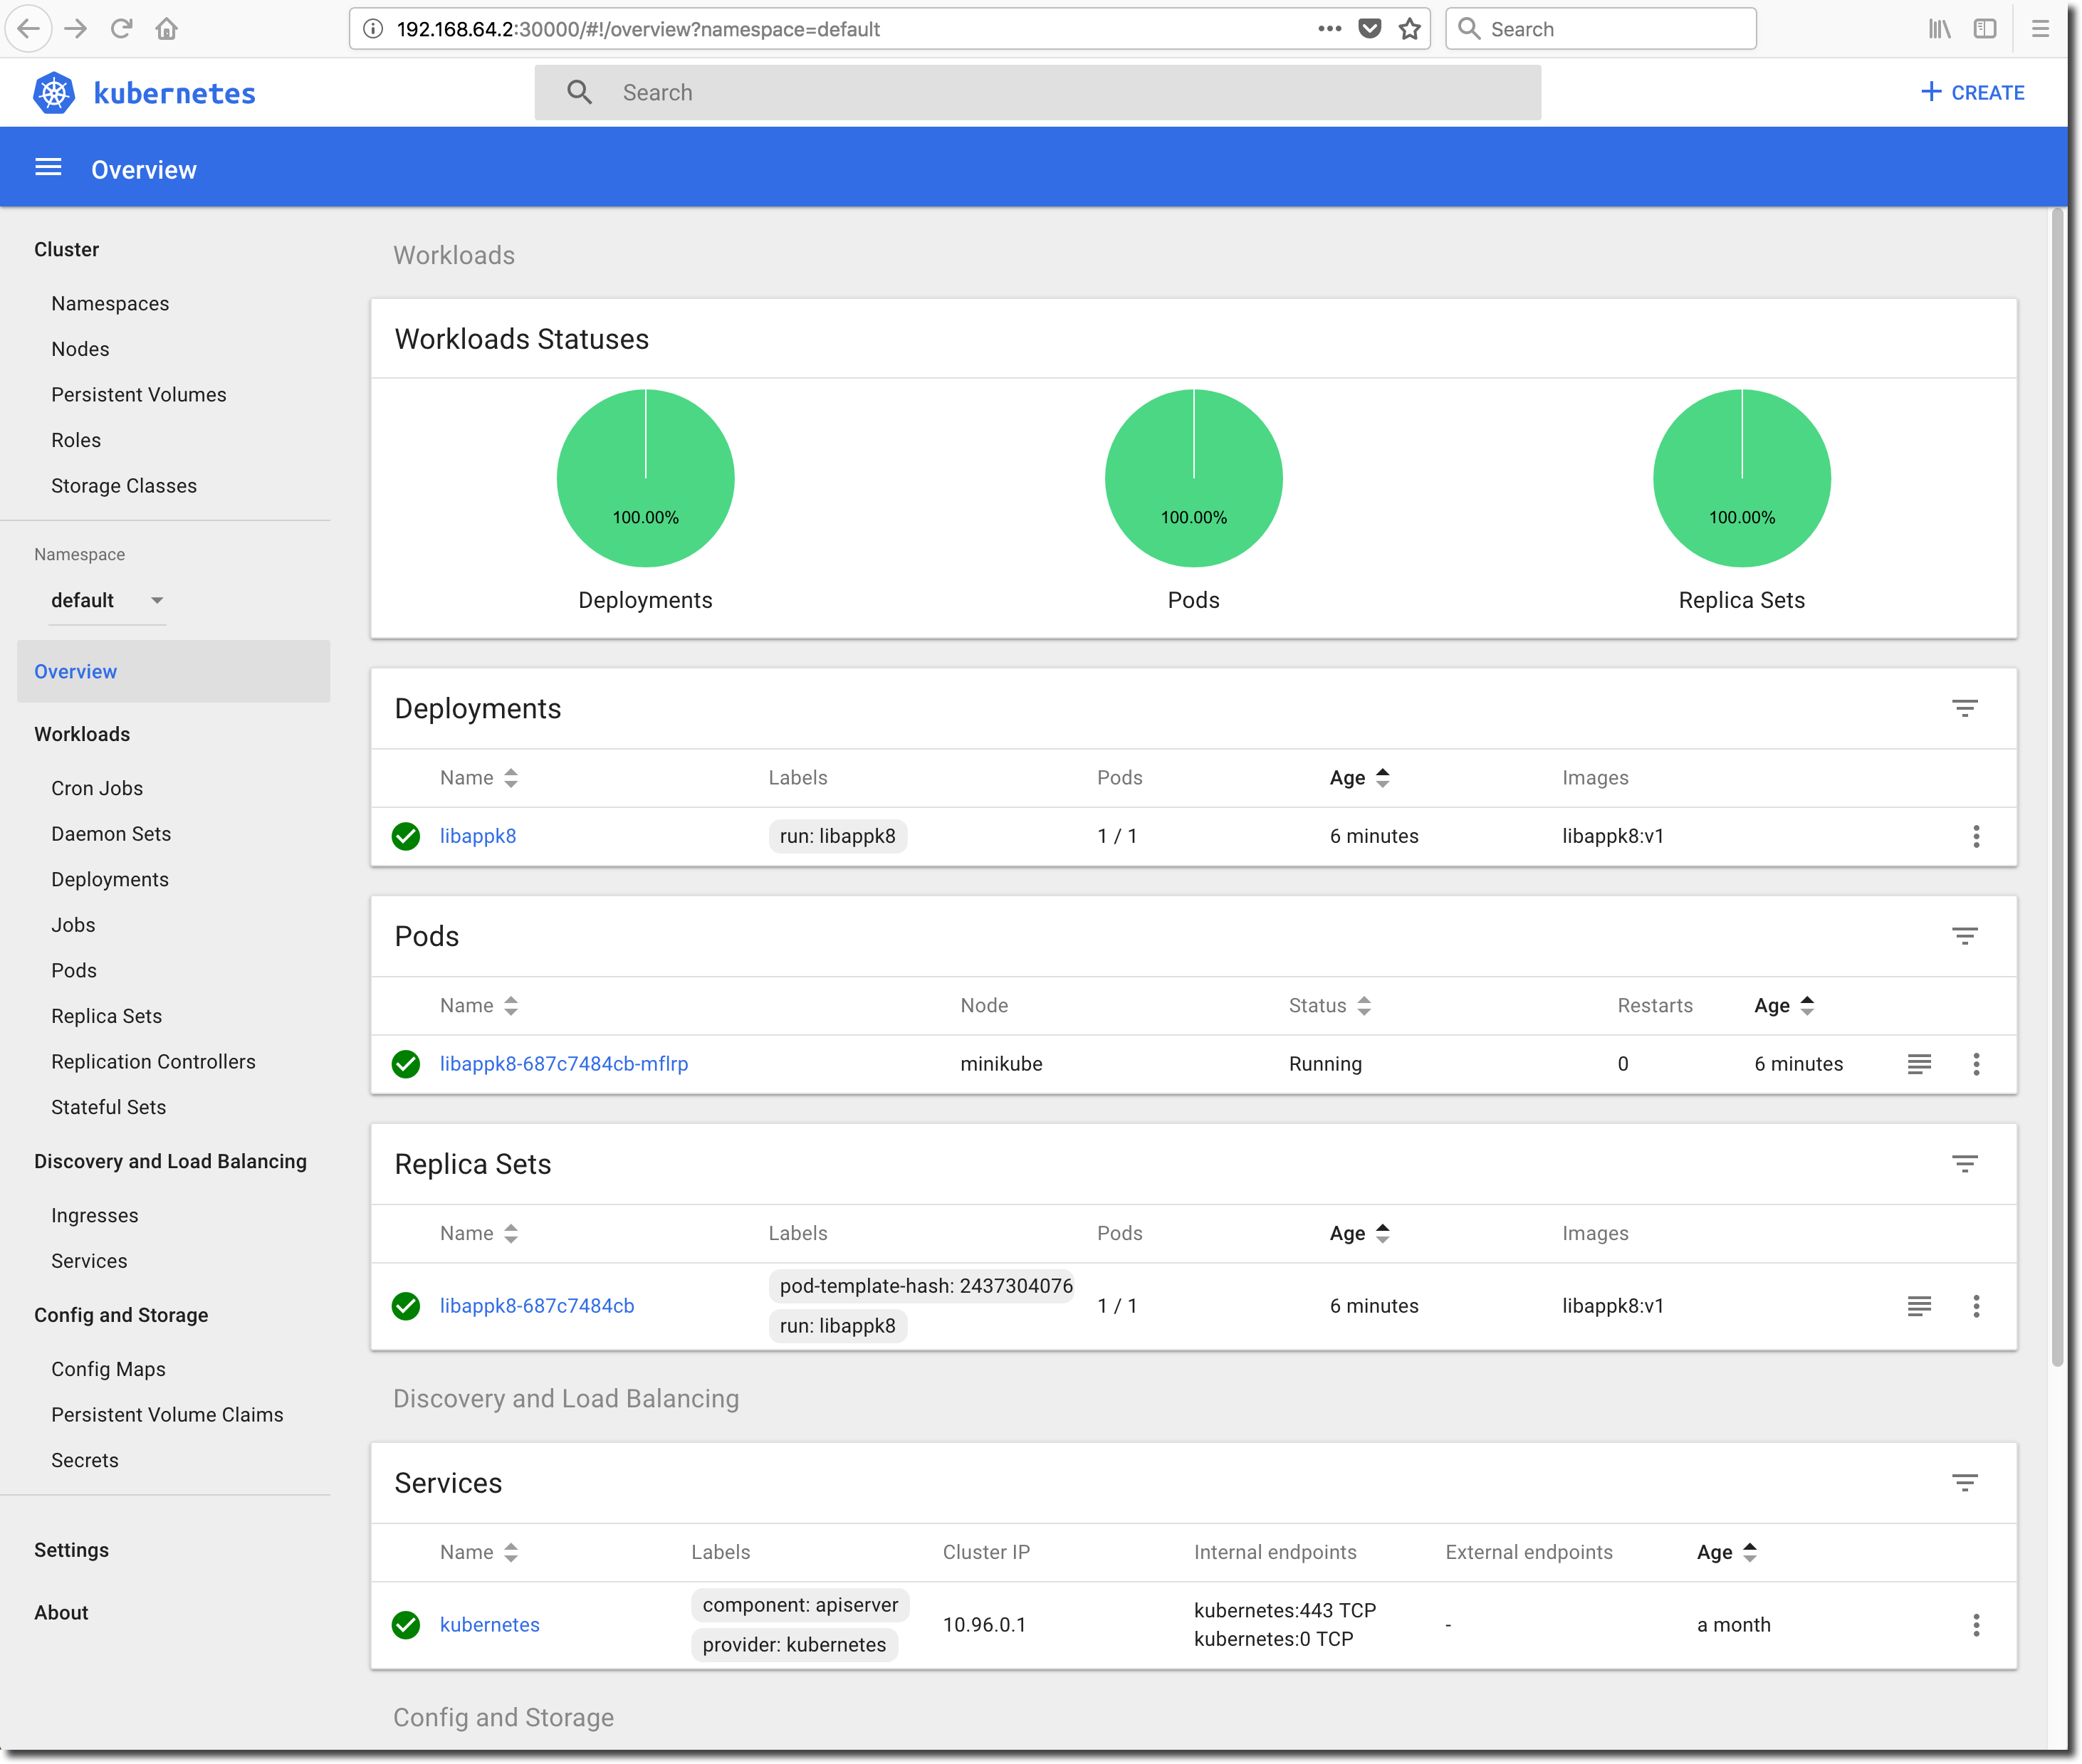
Check the Pod Logs
Now that the application has been deployed into the the minikube cluster and appears to be running we can use the dashboard to check the application logs being emitted from the container’s stdout/stderr. Jiffy runs in a verbose manner at the moment, so a quick check of the log output will provide a good indication of the application’s real health.
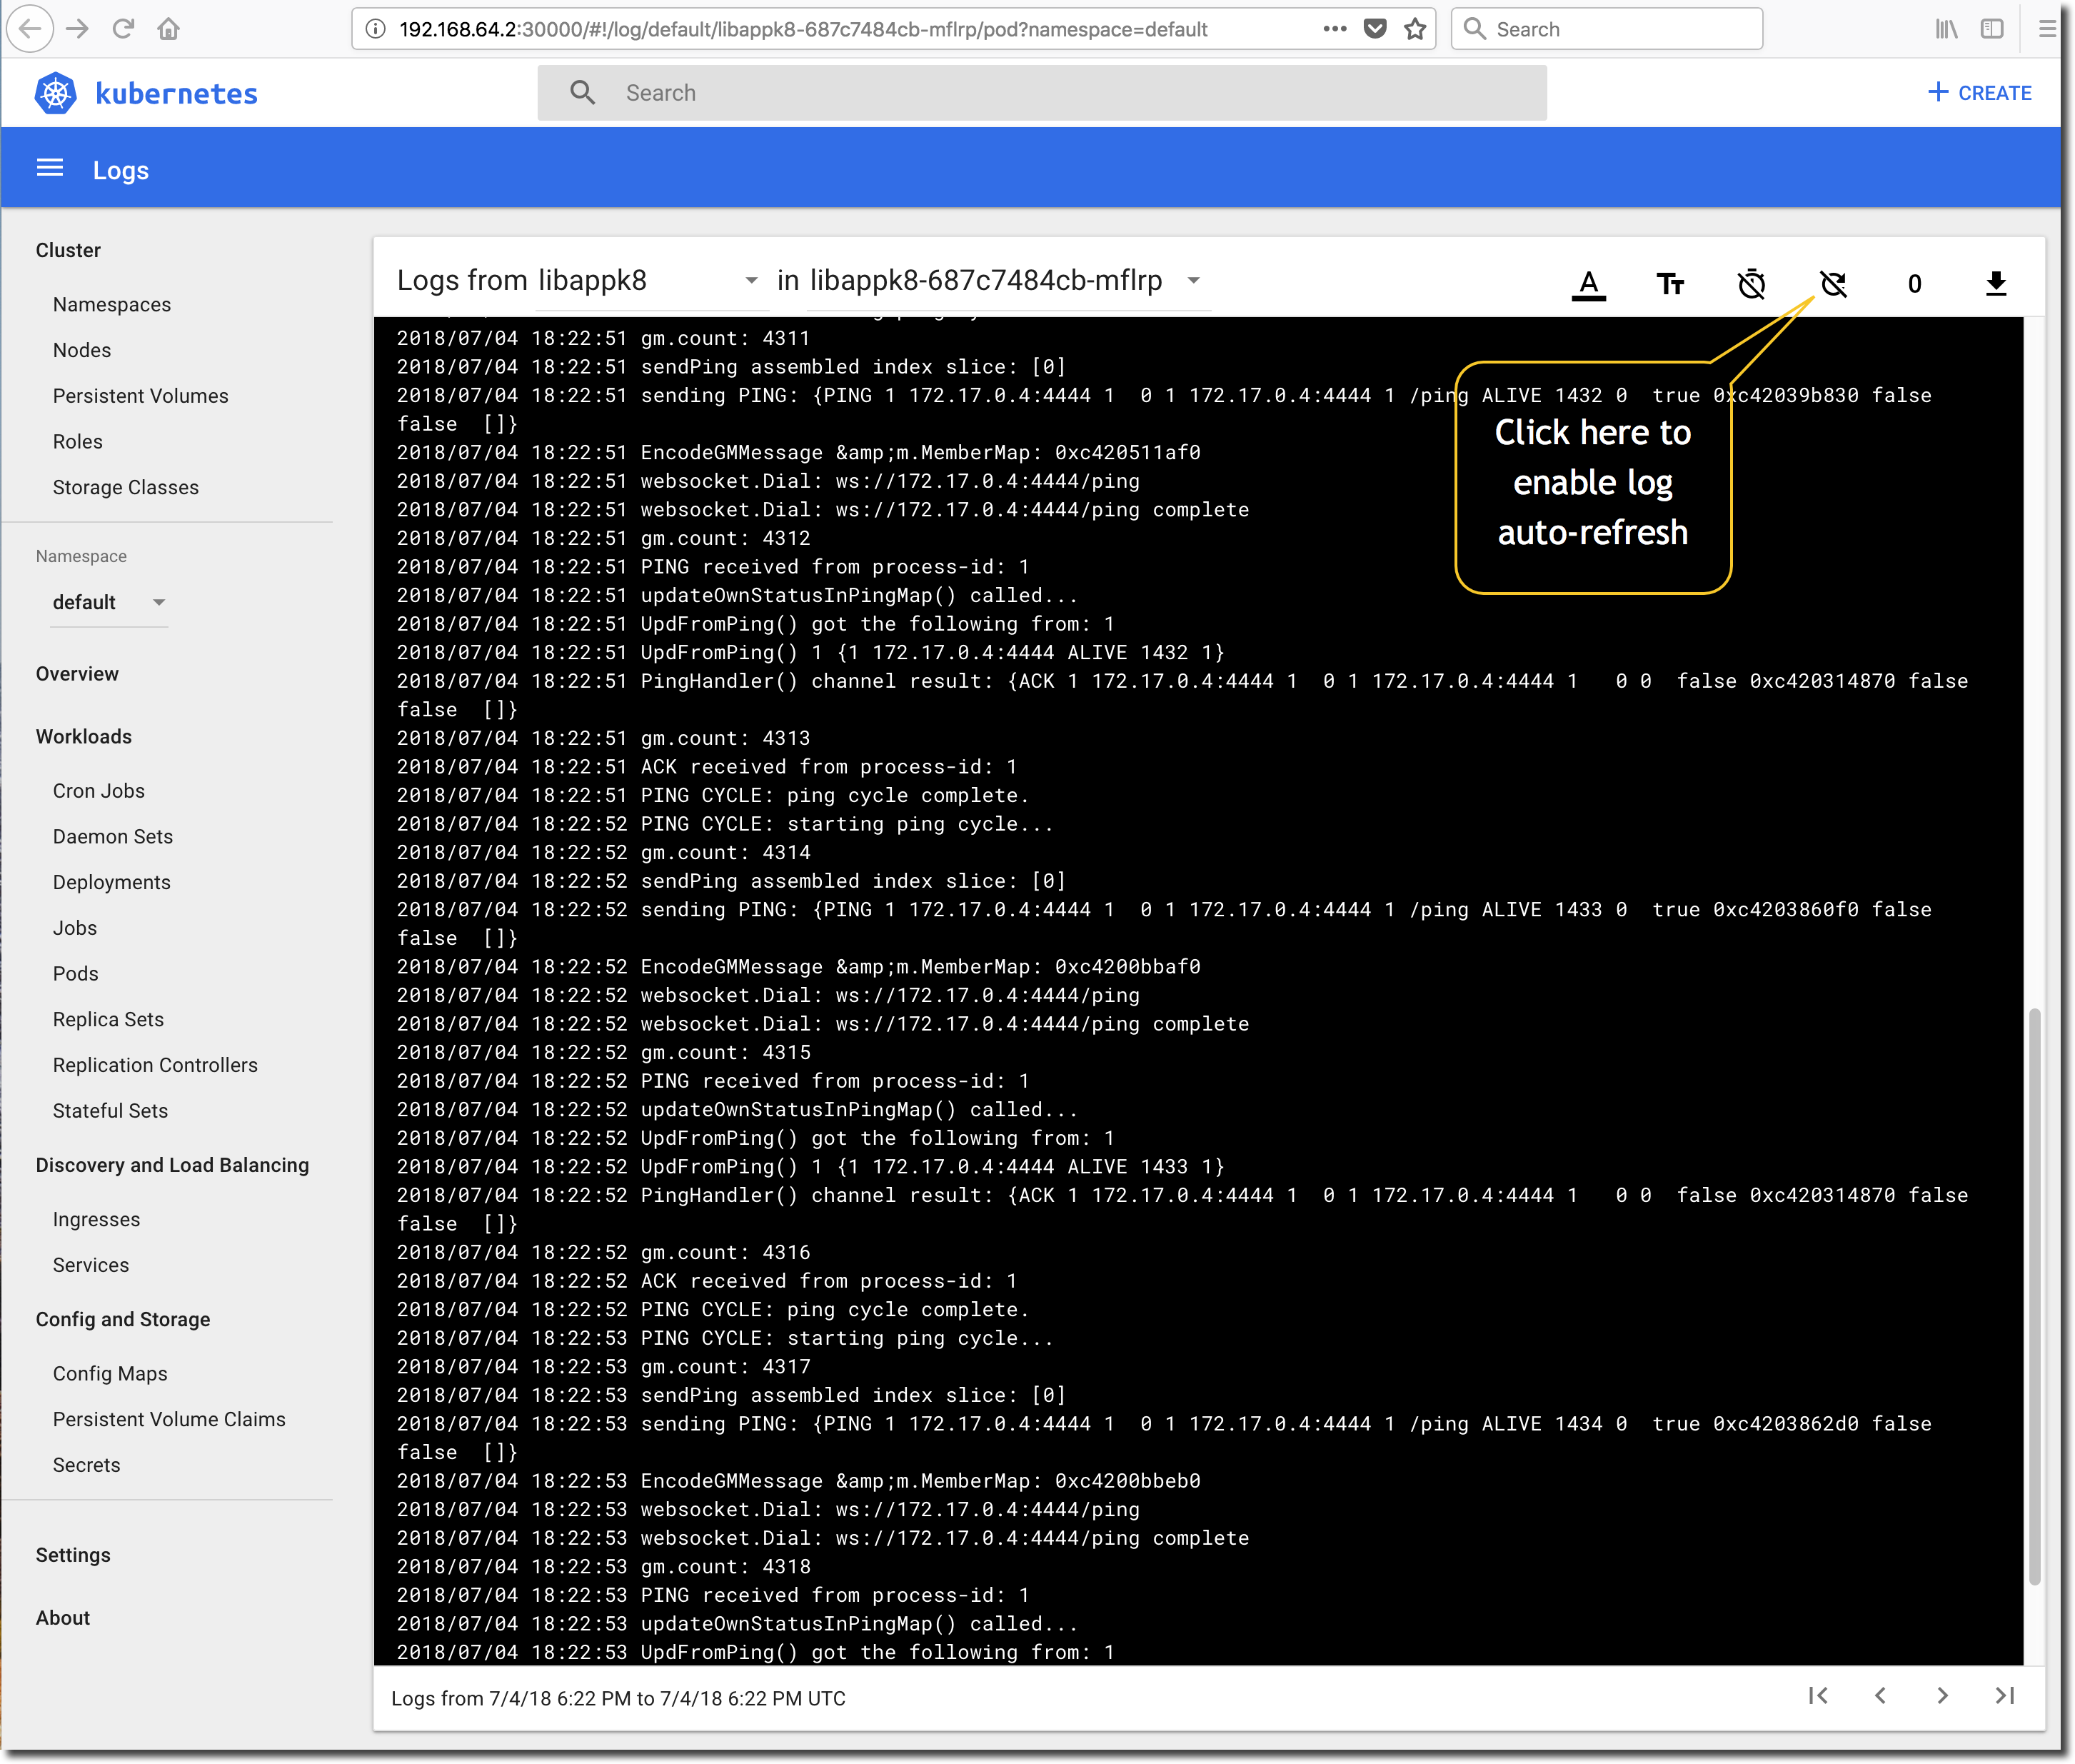
Click on the ‘Pods’ menu-item under the ‘Workloads’ heading in the menubar on left-side of the dashboard screen. As we have only deployed with a single-instance (replica) of the libappk8 application, we should see a single Pod. Click on the logs icon as shown below to view the Pod/container stdout/stderr output:

Upon clicking the logs icon, the dashboard will show a snapshot of the current stdout/stderr output from the Pod. Enable the log auto-refresh by clicking the refresh icon as shown below and verify that the application appears to be in good health.
Scale the Application Up
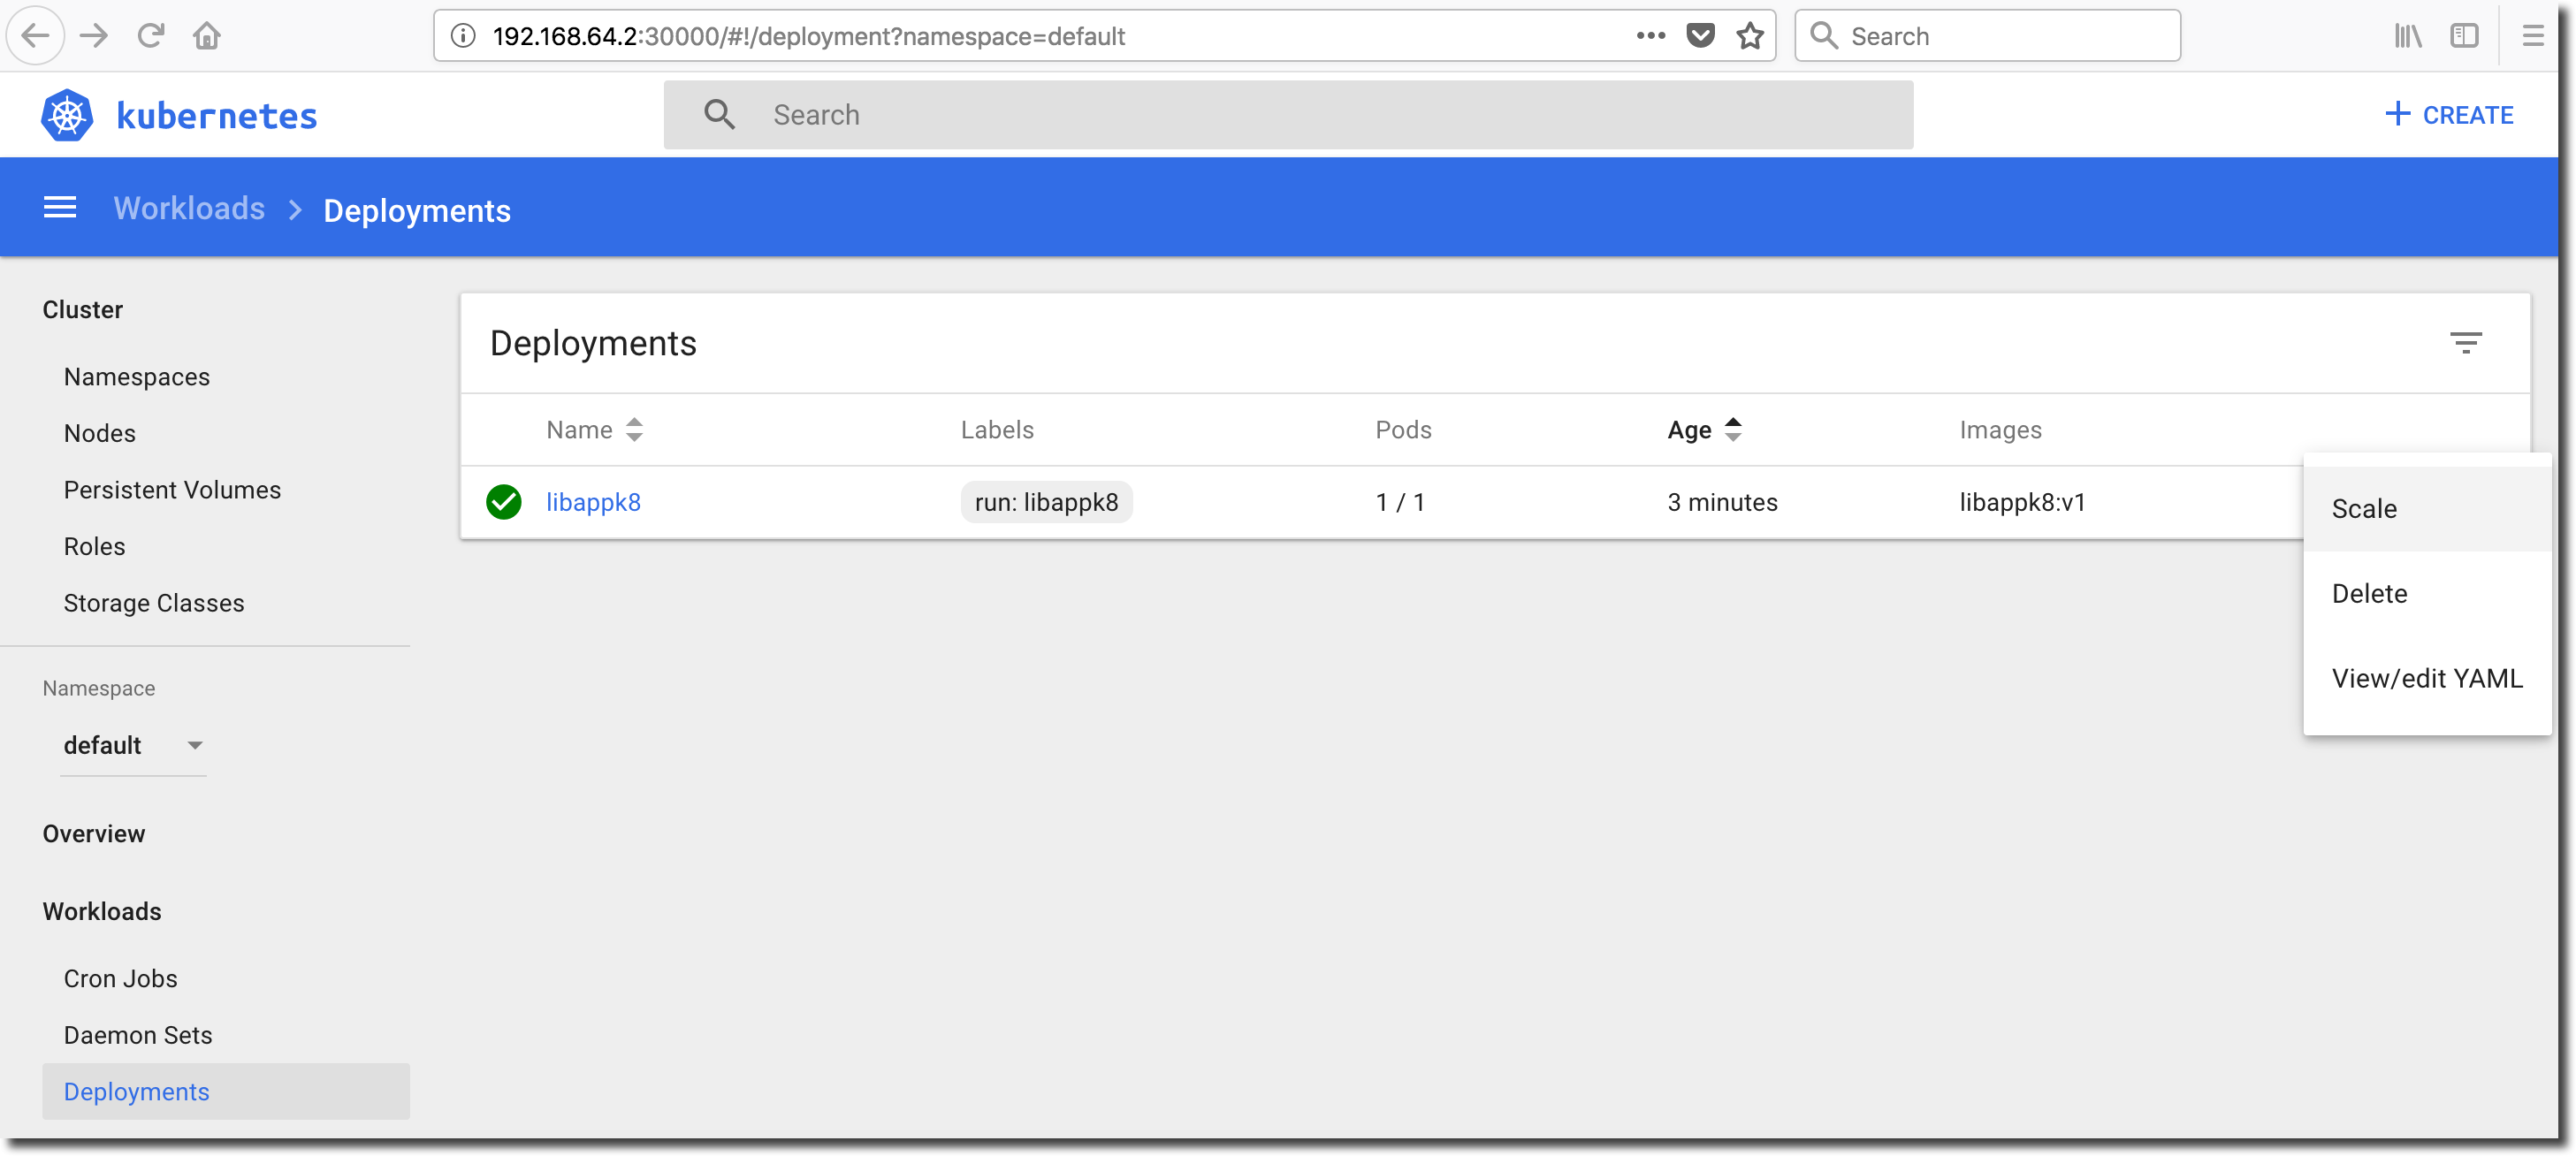
We deployed a single instance (replica) of the application into the minikube cluster resulting the creation of a Deployment containing a single Pod. We can add application instances to the Deployment with a few clicks in the dashboard ‘Deployments’ view. Click on ‘Deployments’ in the menubar located on the left-side of the Kubernetes dashboard screen to see the current libappk8 deployment. Select ‘Scale’ from the ‘Action’ drop-down on the right-hand-side of the libappk8 deployment row:
Increase the number of desired Pods from 1 to 4. Each Pod will run a distinct instance of the containerized jiffy application.
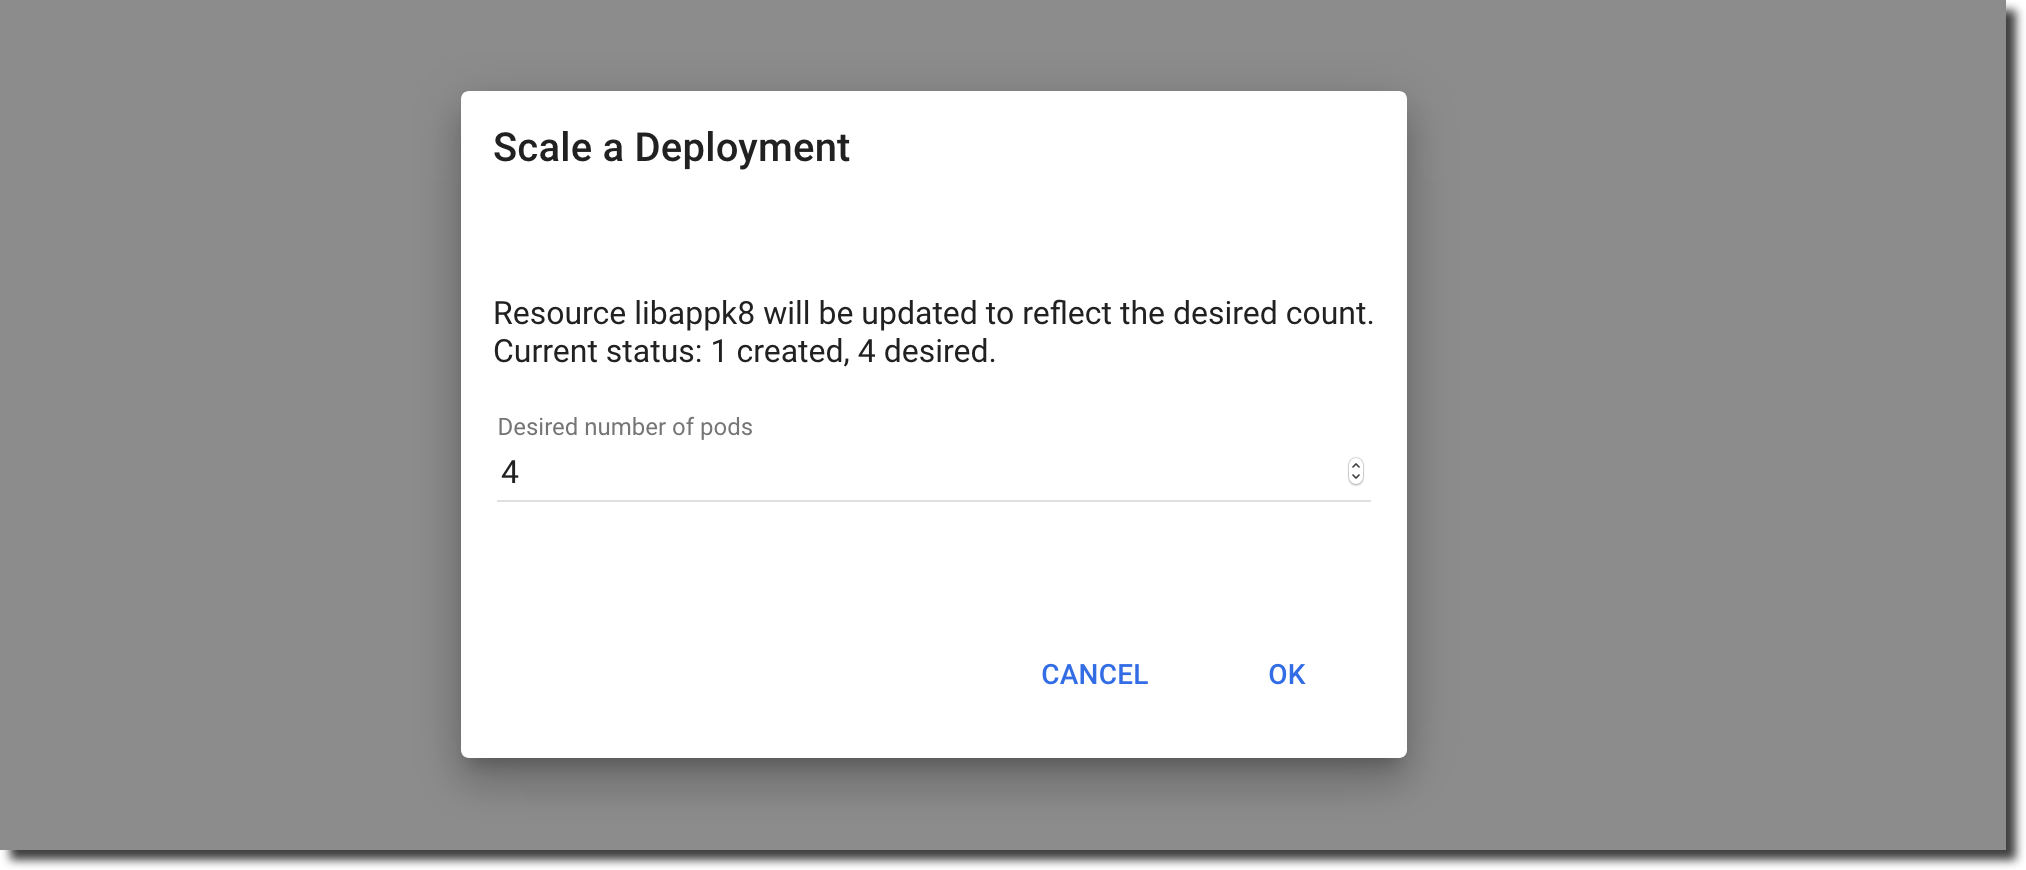
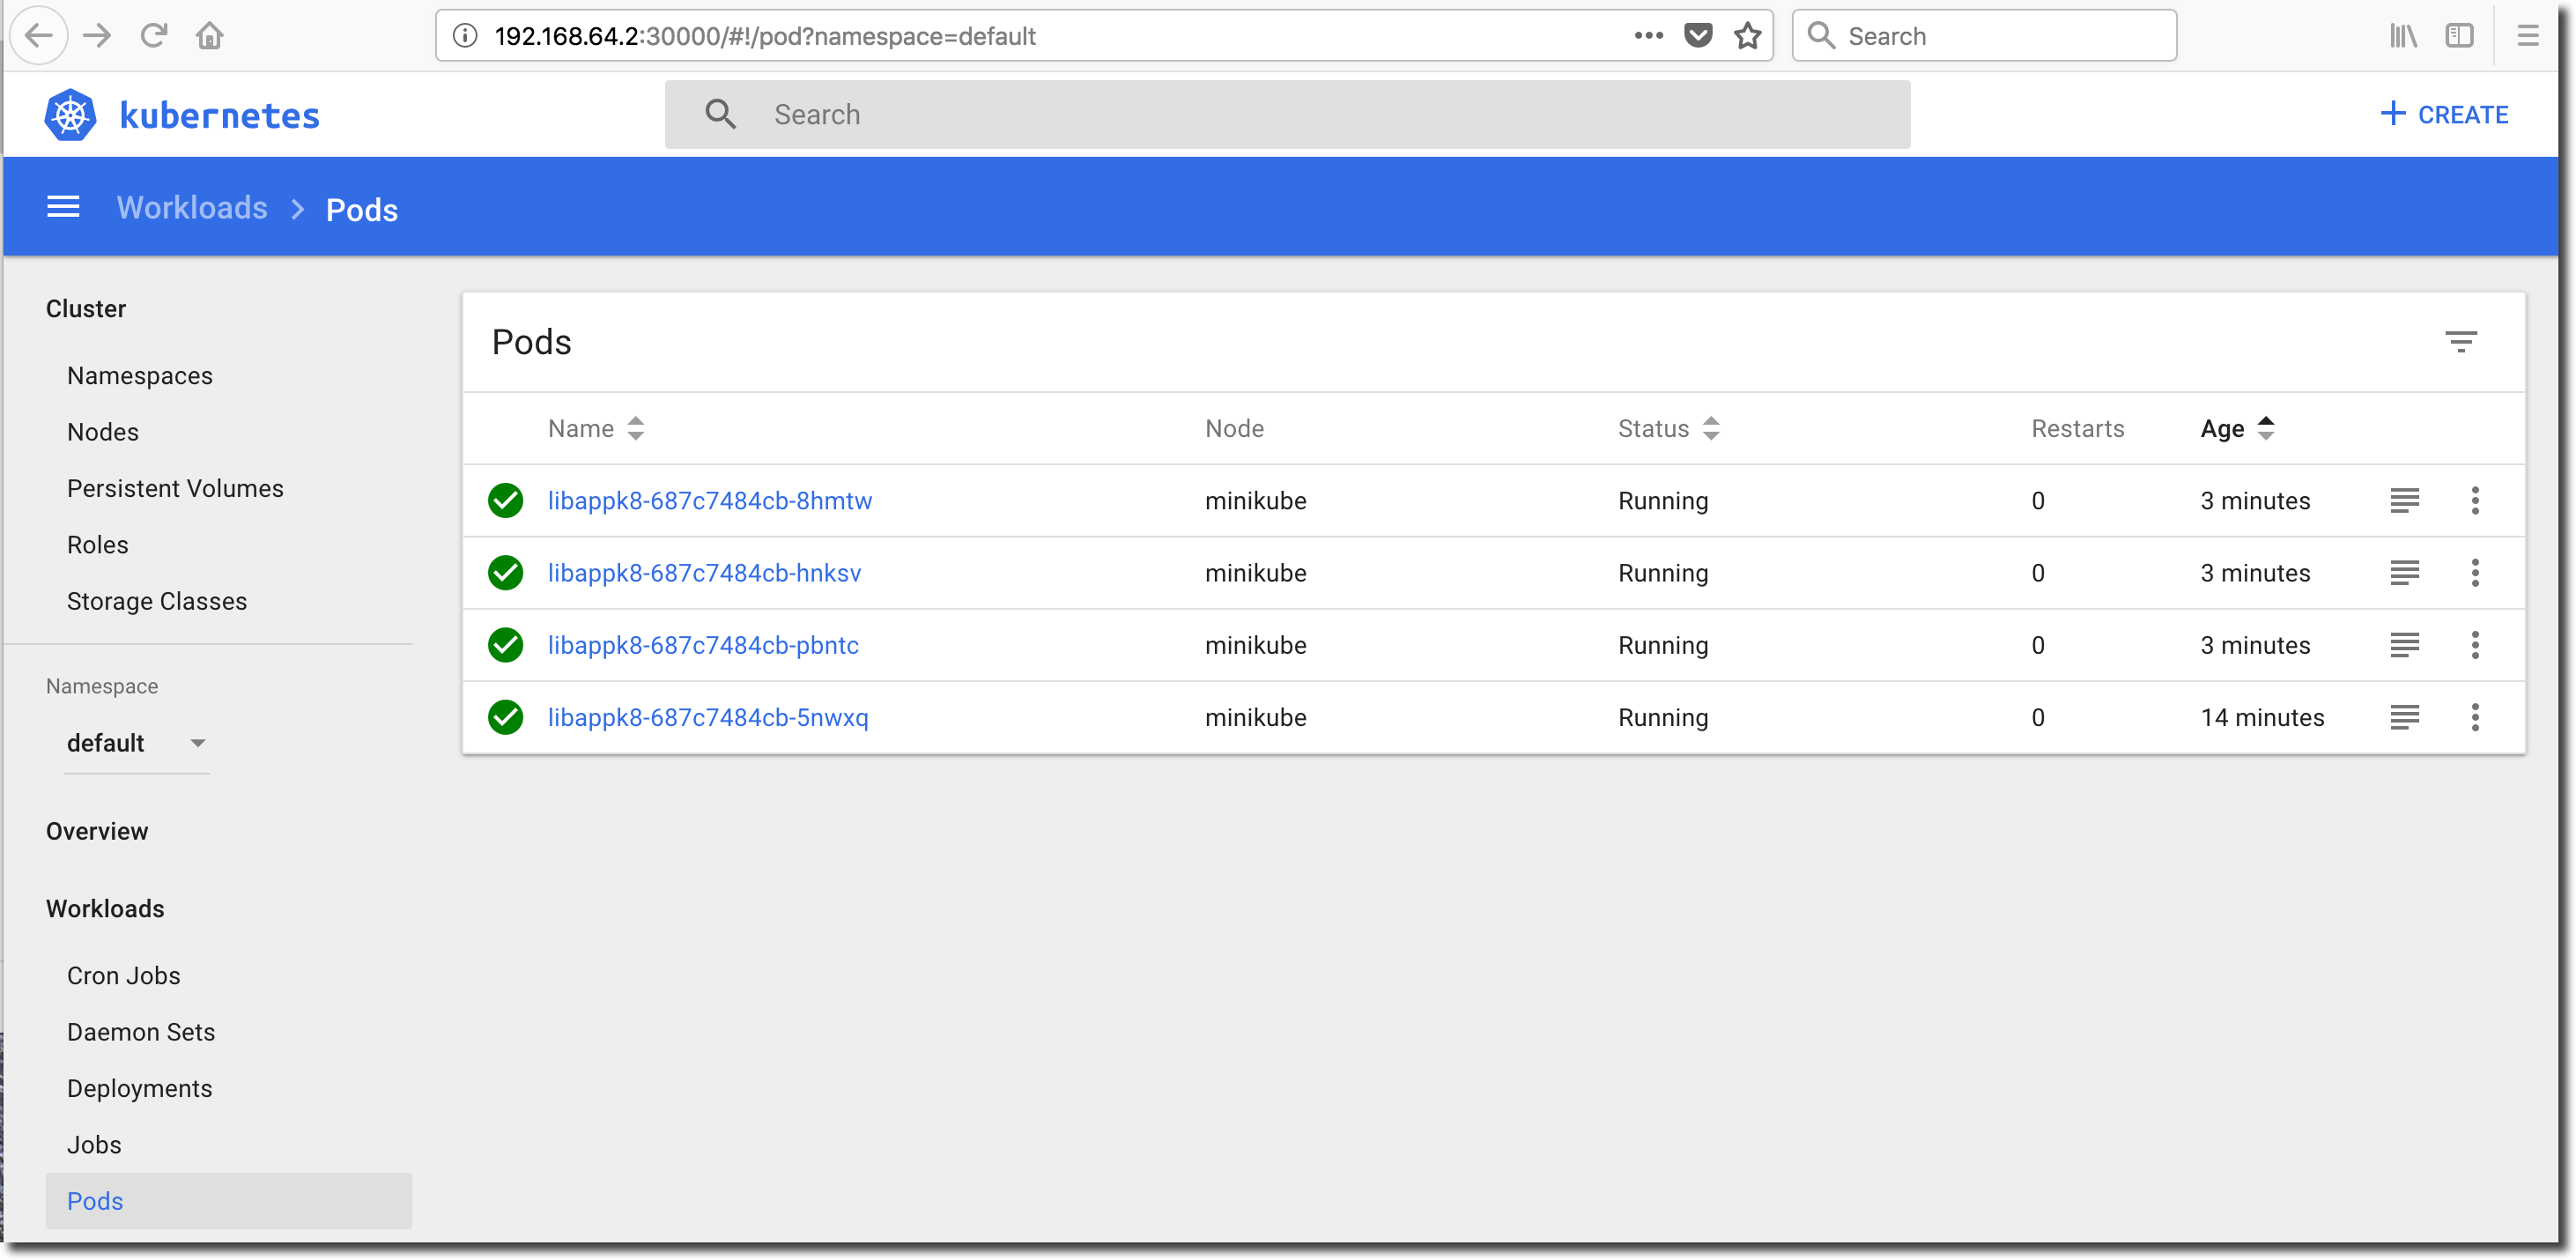
Notice that the number of Pods in the libappk8 Deployment row has increased as requested and the number of running Pods climbs to 4/4 in a few seconds. Click on ‘Pods’ in the menubar located on the left-side of the dashboard to view the list of Pods:
Examine the log of each Pod and ensure that the application instances running in the Pods can see each other. This is important from a cache management perspective. Remember that each jiffy application instance caches authorization related information to mitigate the need for database round-trips or network calls while processing a service request.
In order for each application instance’s cache to remain current, any application instance that processes a successful update of authorization/access information must propagate the change to the other application instances in the group. When viewing the Pod logs, you should see something like this:
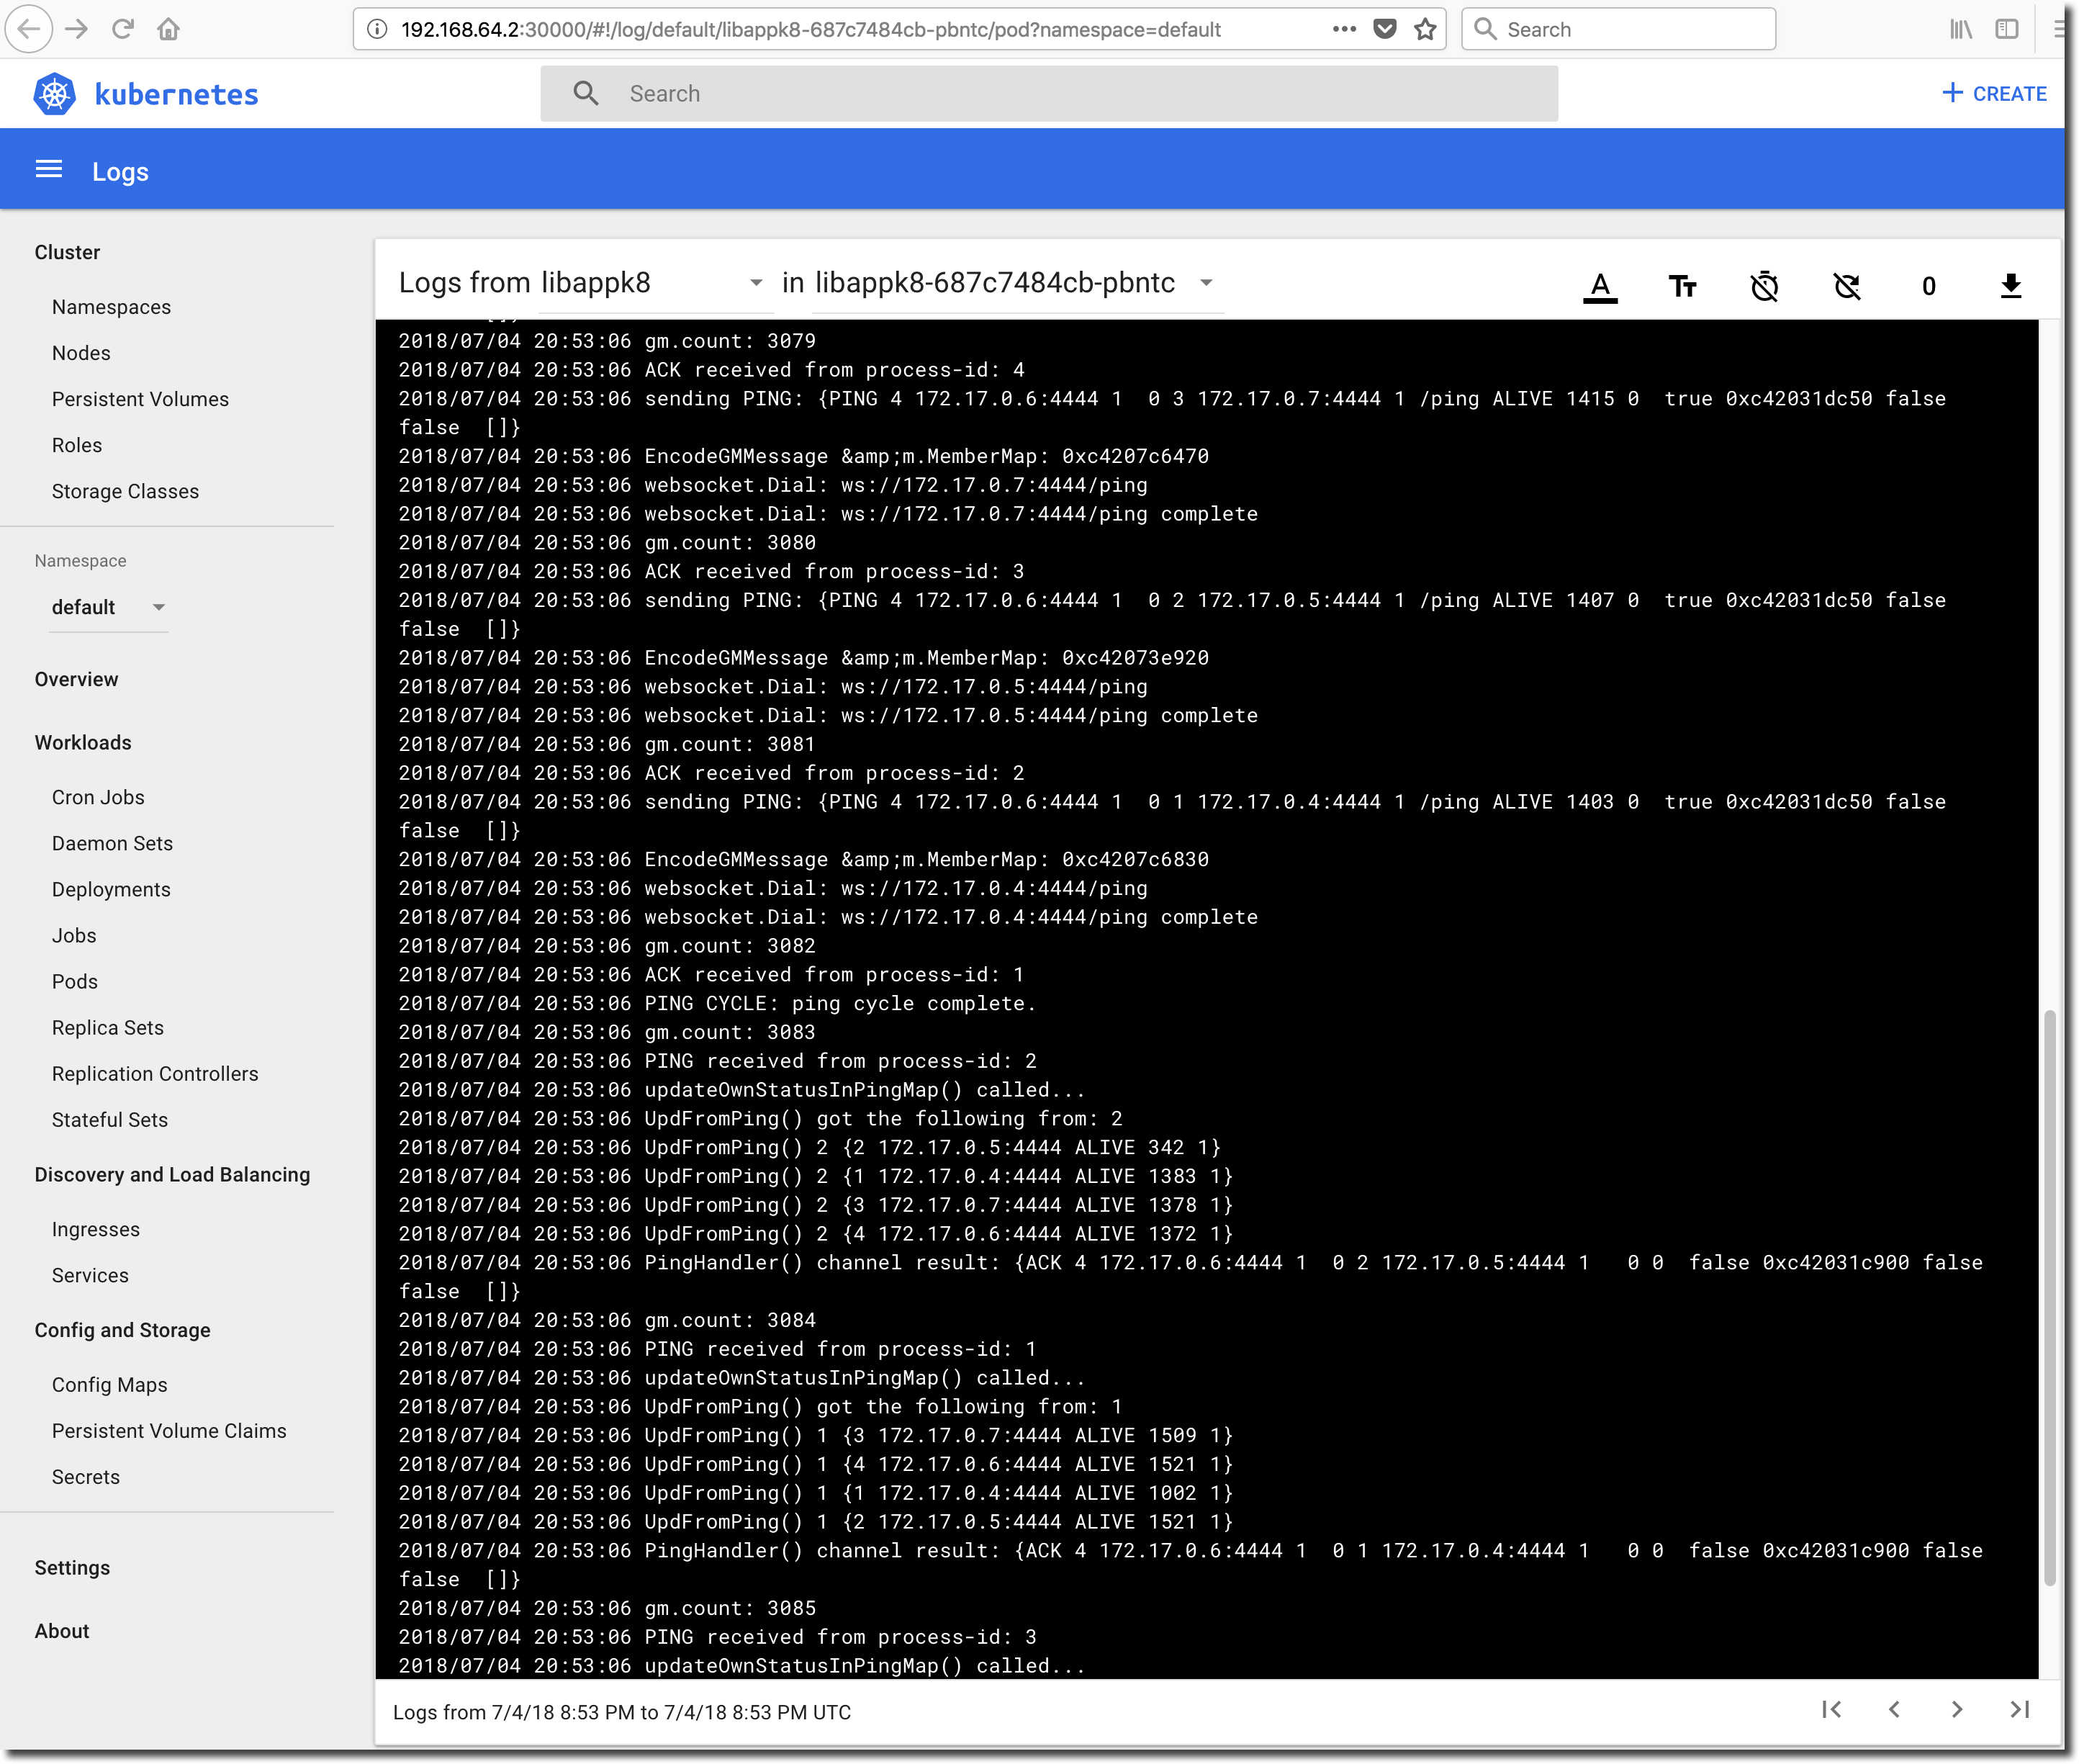
The ‘UpdFromPing()’ lines contain information regarding the Ping source-Pod’s view of the group. Generally speaking, you can expect to see a ‘UpdFromPing()’ line for each Pod in the Deployment and a set of ‘UpdFromPing()’ records from each Pod in the Deployment. ALIVE statuses are good, SUSPECT and FAILED statuses are not so good.
Expose the Deployment via a Kubernetes Service
So far we have created and scaled a Deployment of the libappk8 application, but we have yet to access any of the application services. Before accessing the libappk8 services, we need to expose the Deployment through the creation of a Kubernetes Service. In order to expose the libappk8 Deployment via a Kubernetes Service we will fall back to the command-line.
Get Deployments
First we will show how to examine the libappk8 Pods and Deployment from the command-line:
kubectl get deployments
Results in output similar to:
NAME       DESIRED   CURRENT   UP-TO-DATE   AVAILABLE   AGE
libappk8   4         4         4            4           50m
Get Pods
Next we will show how examine the list of Pods in the libappk8 Deployment from the command-line:
kubectl get pods
Results in output similar to:
  NAME                        READY     STATUS    RESTARTS   AGE
  libappk8-687c7484cb-5nwxq   1/1       Running   0          53m
  libappk8-687c7484cb-8hmtw   1/1       Running   0          42m
  libappk8-687c7484cb-hnksv   1/1       Running   0          42m
  libappk8-687c7484cb-pbntc   1/1       Running   0          42m
Get Kubernetes Services
Next we will show how to examine the list of Kubernetes Services running on the minikube cluster. Remember that we told kubectl which Kubernetes cluster to connect to in an earlier step (link).
kubectl get services
Results in a list of Kubernetes Services:
  NAME         TYPE        CLUSTER-IP   EXTERNAL-IP   PORT(S)   AGE
  kubernetes   ClusterIP   10.96.0.1    <none>        443/TCP   36d
As you can see, the libappk8 Deployment is not yet available as a service.
Create a Service for the libappk8 Deployment
We will now create a Kubernetes Service for the libappk8 Deployment. Creation of the service will allow us to expose the application end-points via the load-balance built into the Kubernetes stack. There are several options for the type of service that will be exposed, but for single Node testing with minikube the ‘LoadBalancer’ type works well. Create a new service from the libappk8 Deployment as follows:
kubectl expose deployment libappk8 --type=LoadBalancer
Creation of the service should result in output similar to:
service "libappk8" exposed
Check that the service has been created and is running:
kubectl get services
You should see a new line in the Services table with the correct name and TYPE. In a productive scenario, configuration would have been done to allocate an EXTERNAL-IP to the new Service. Minikube does not allocate an external address for exposed Kubernetes Services, but exposes them via a port on the Cluster’s server address.
  NAME         TYPE           CLUSTER-IP      EXTERNAL-IP   PORT(S)          AGE
  kubernetes   ClusterIP      10.96.0.1       <none>        443/TCP          36d
  libappk8     LoadBalancer   10.103.54.235   <pending>     8080:32700/TCP   1m
Get the Base URL for the Kubernetes Service
There are a few ways to get the base-address of our new libappk8 Kubernetes Service.
- From the command-prompt using the –url flag.
- From the command-prompt using the Cluster config and Service port mapping information.
- From the Kubernetes dashboard using the Node configuration and Service port mapping information.
Get the Service Base URL from the Command-Prompt
minikube service libappk8 --url
This command will return the base URL of the libappk8 service:
http://192.168.64.2:32700
Get the Service Base URL from the Cluster Config / Service Port Mapping
Another way to determine the base URL of the libappk8 service is to inspect the Service -> Node port mapping as well as the Cluster configuration. If we look at the result from the kubectl get services command we can see that Service port tcp:8080 is mapped to Node port tcp:32700:
libappk8 LoadBalancer 10.103.54.235
8080:32700/TCP 1m
All we need now is the ipv4 address that the LoadBalancer is using. We retrieve this value by running the following command to review the cluster’s configuration:
kubectl config view
The result of which will be similar to:
apiVersion: v1
clusters:
- cluster:
    certificate-authority: /Users/stevem/.minikube/ca.crt
    server: https://192.168.64.2:8443
  name: minikube
contexts:
- context:
    cluster: minikube
    user: minikube
  name: minikube
current-context: minikube
kind: Config
preferences: {}
users:
- name: minikube
  user:
    client-certificate: /Users/stevem/.minikube/client.crt
    client-key: /Users/stevem/.minikube/client.key
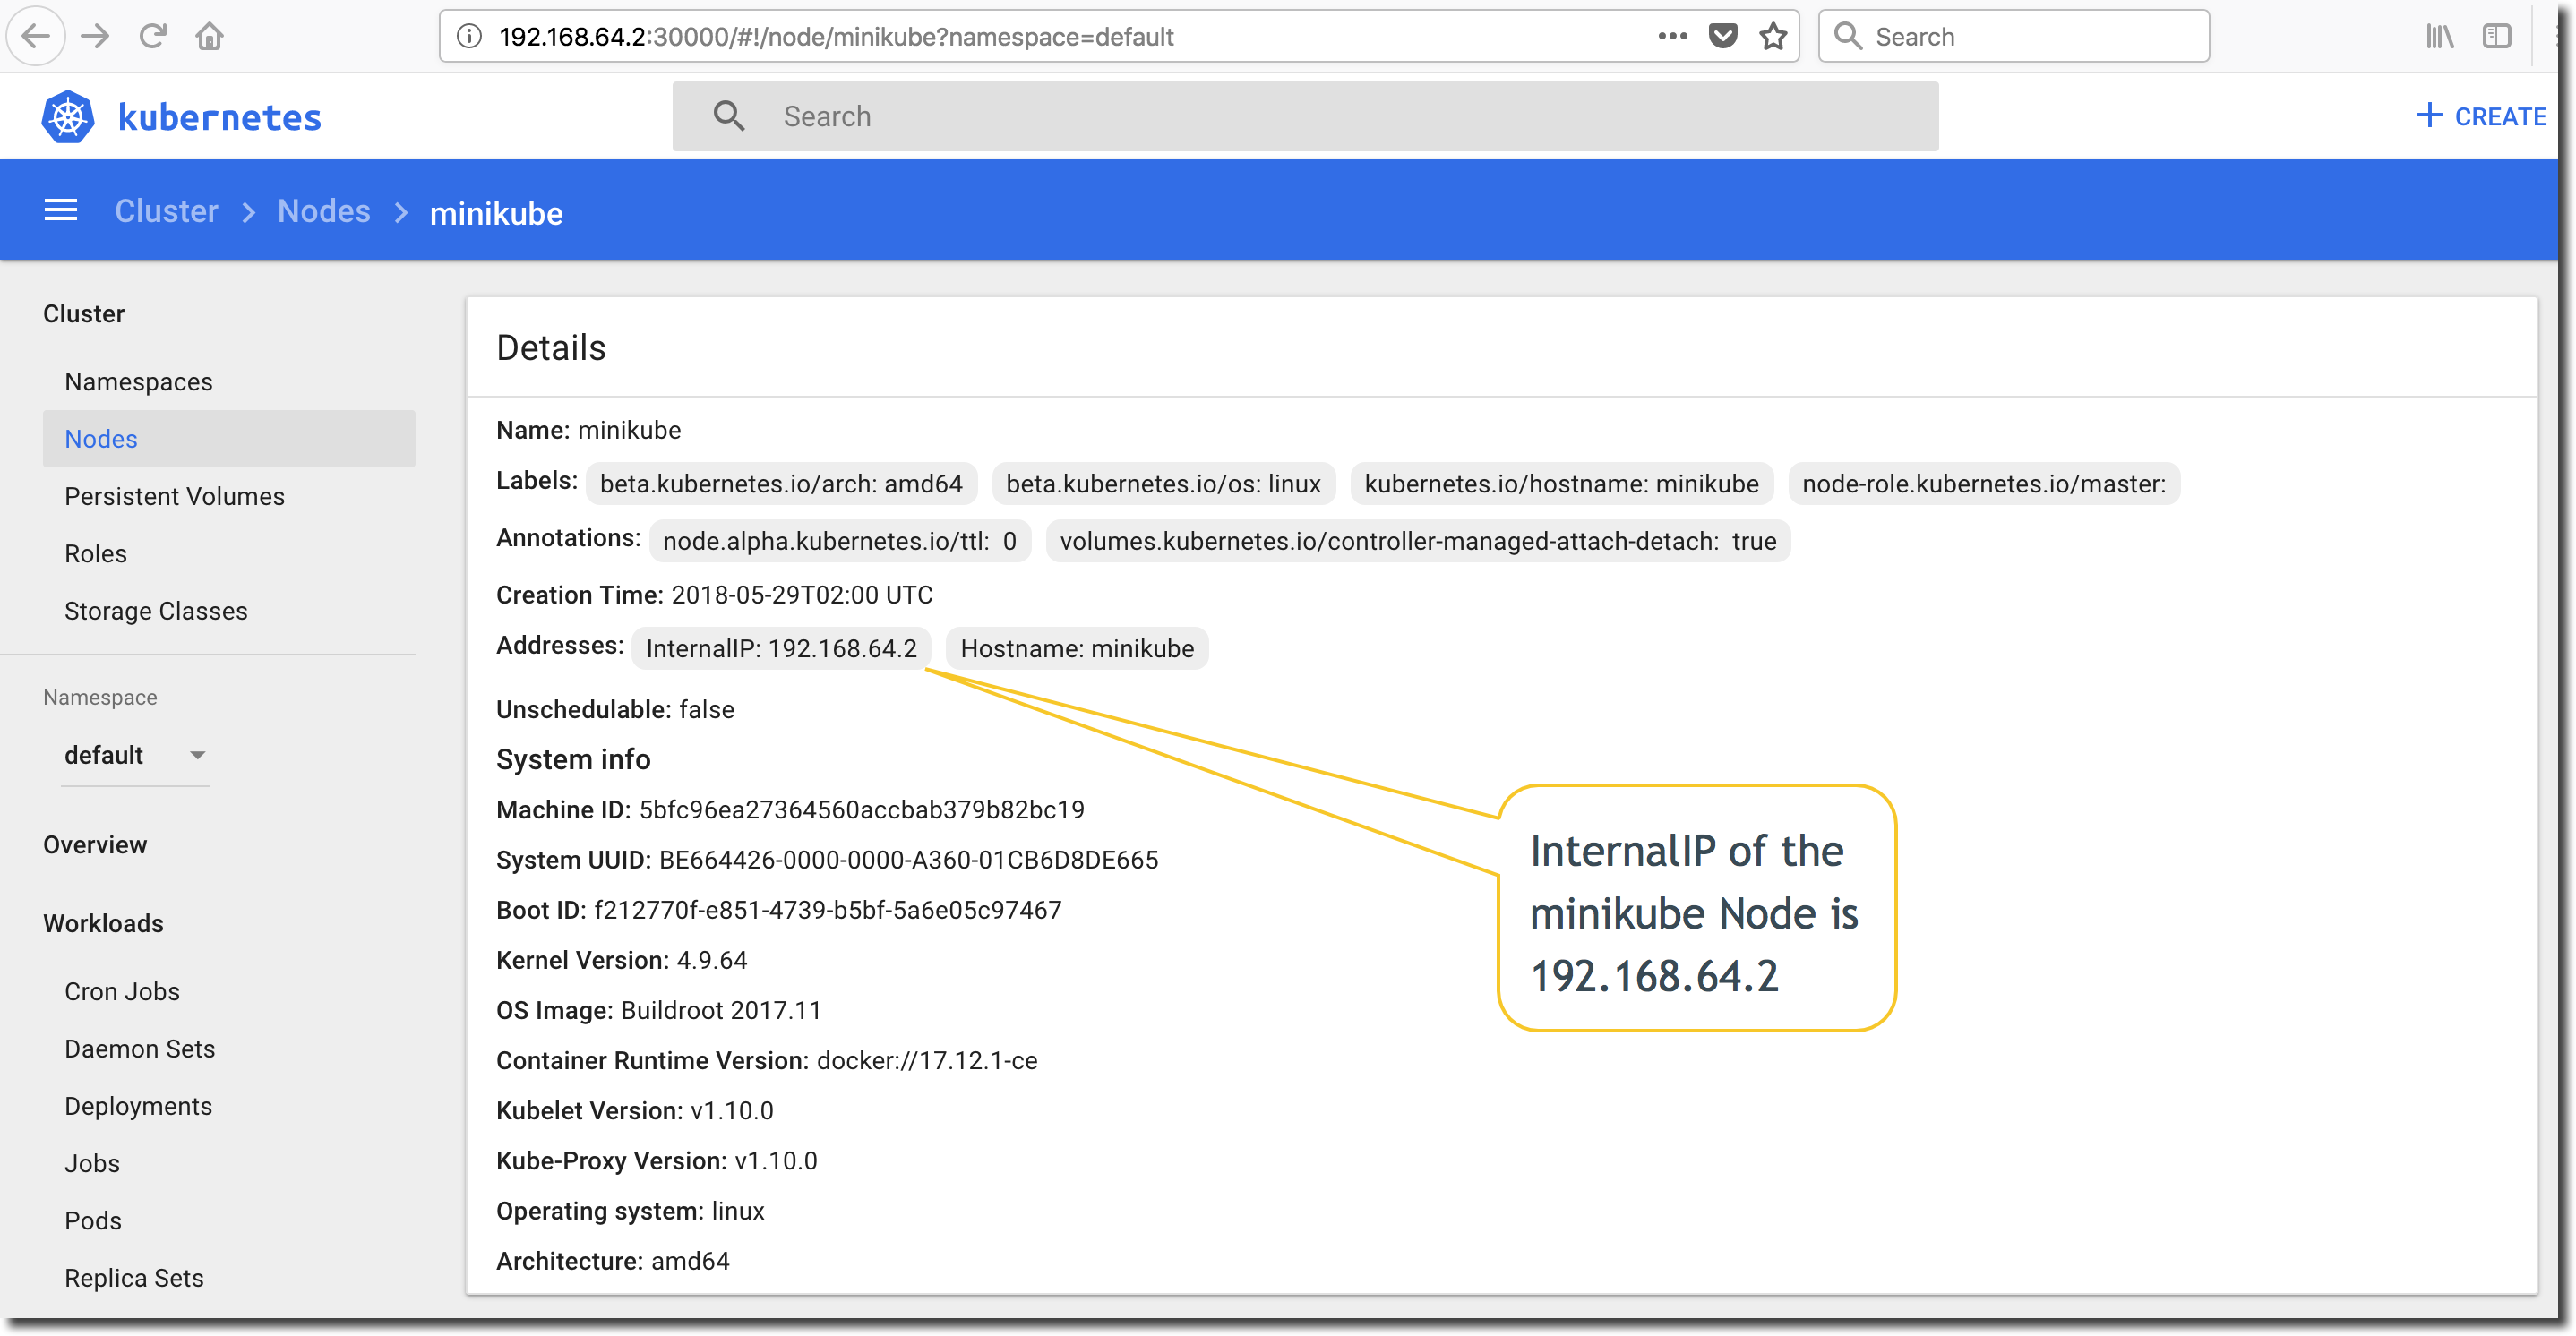
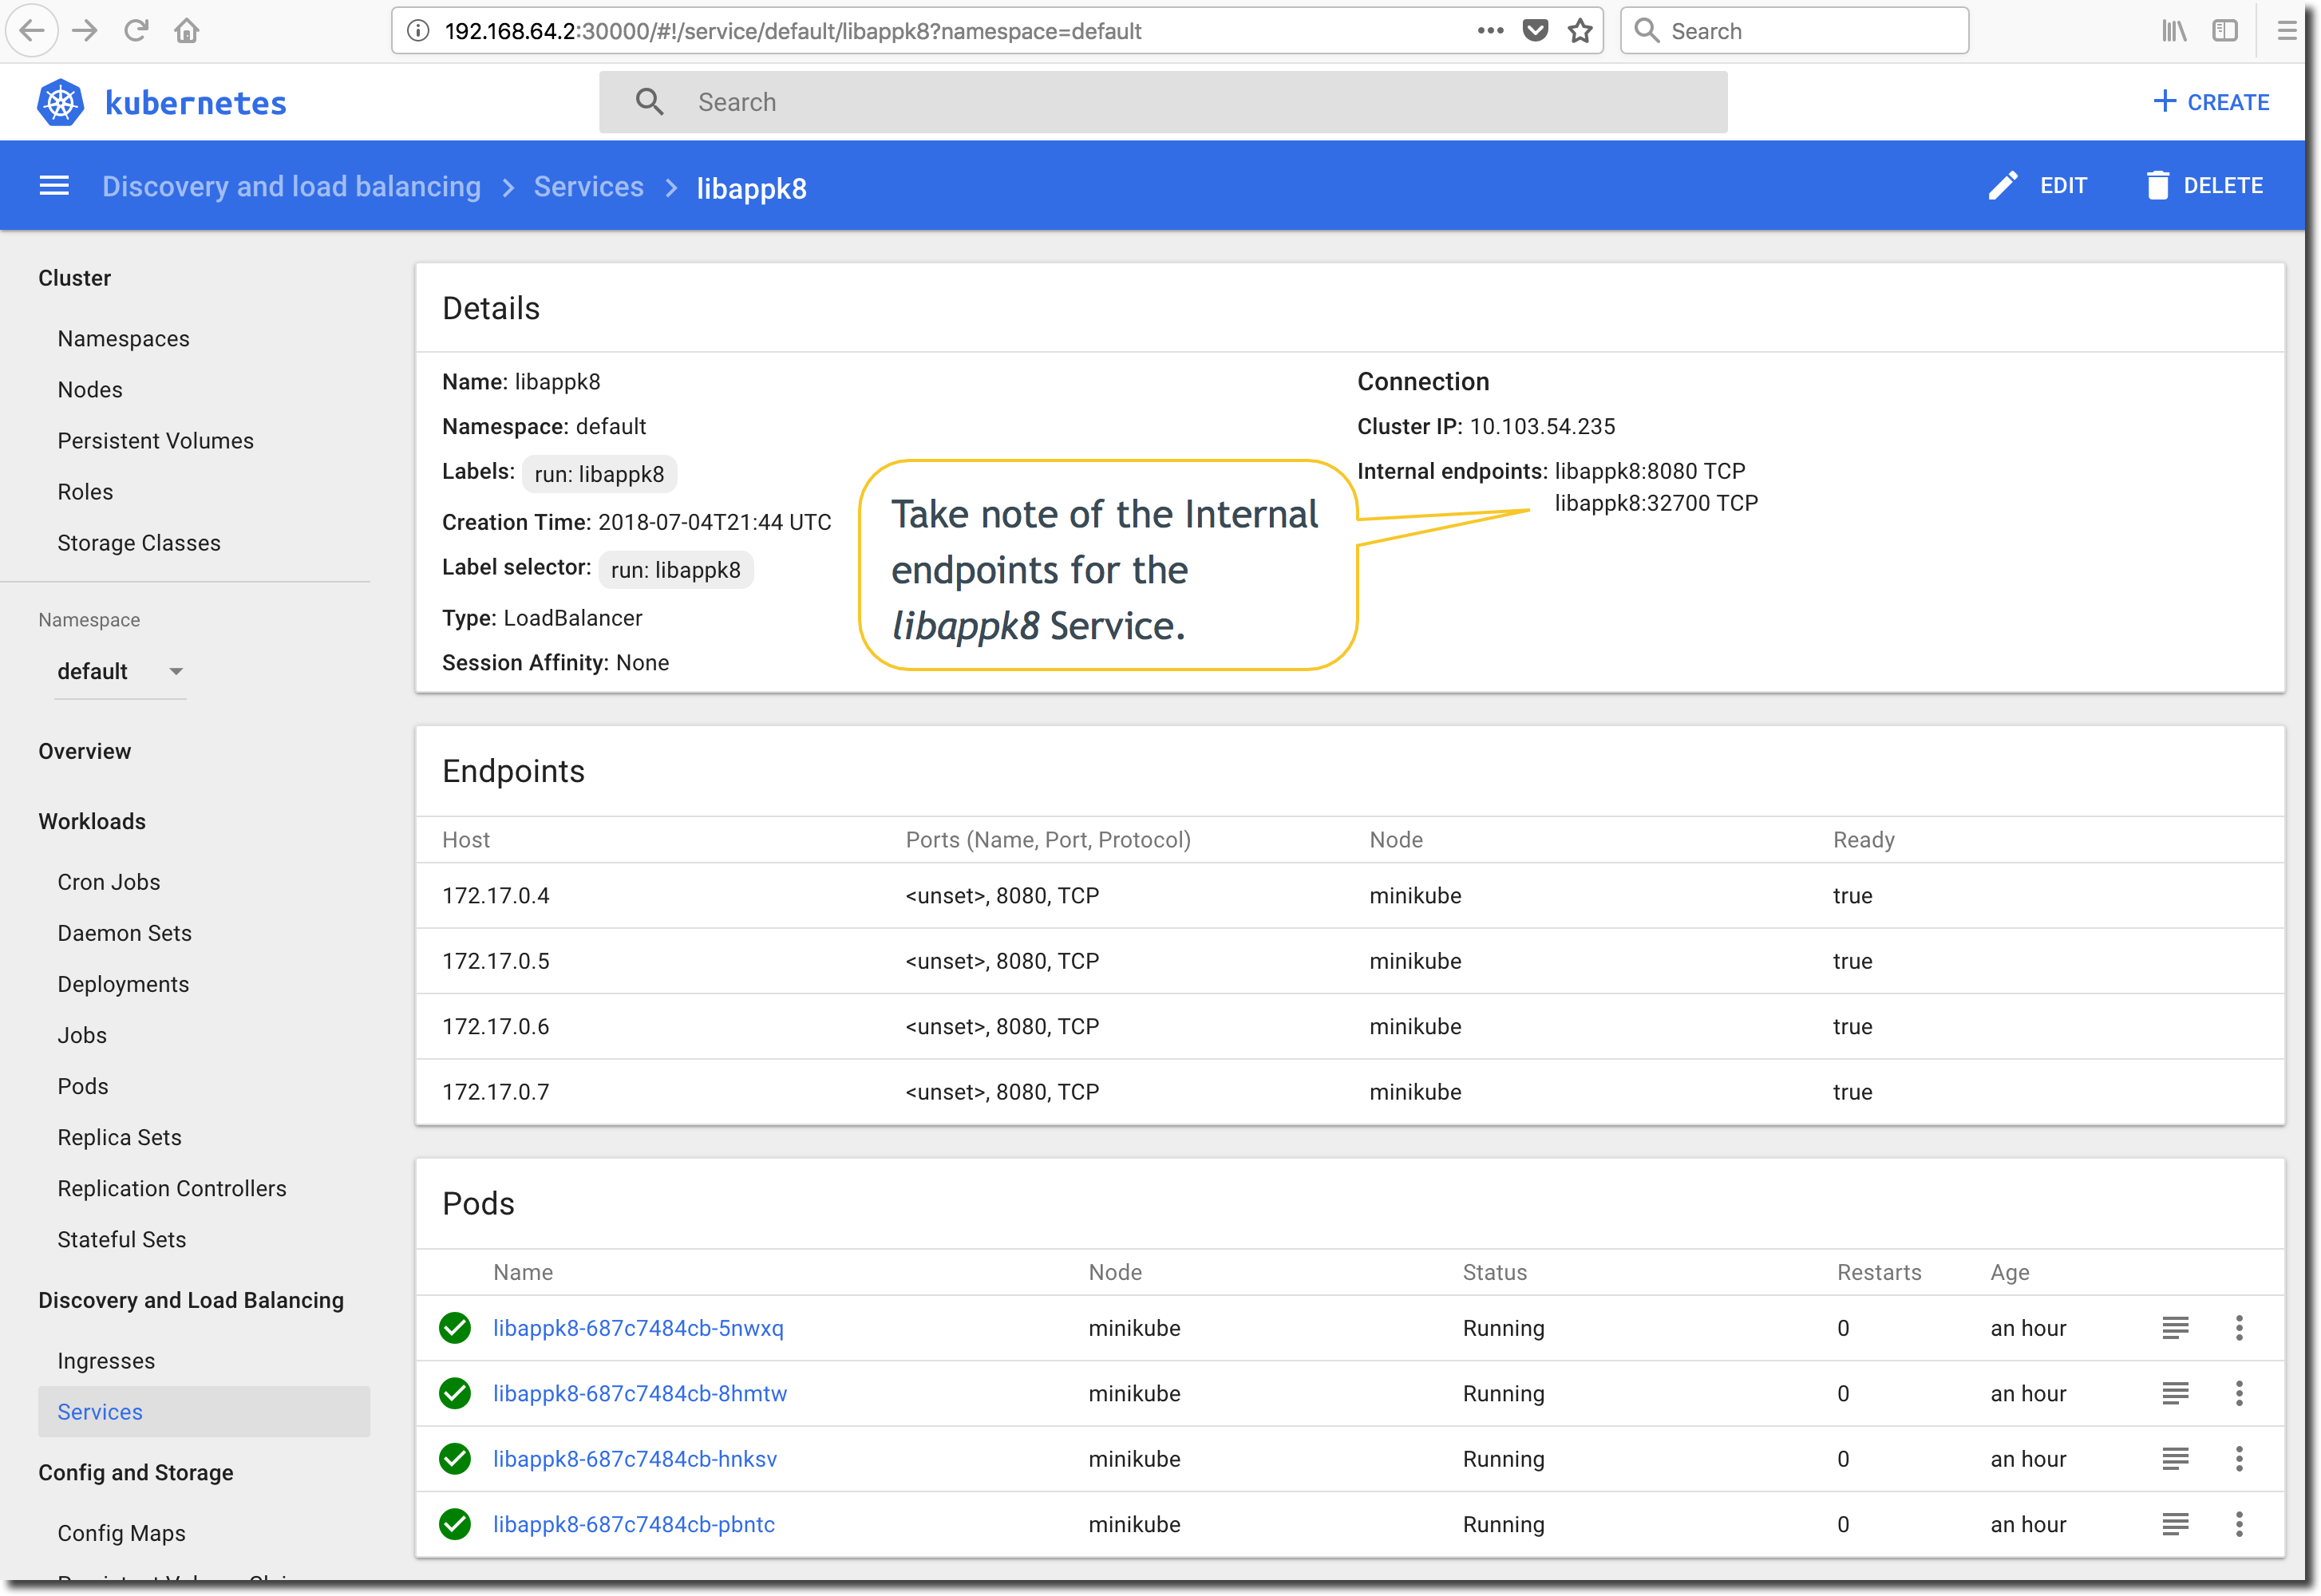
Take note of the ‘server:’ key. This tells us the InternalIP of the minikube Node (192.168.64.2). The base address of our exposed Kubernetes Service is therefore 192.168.64.2:32700.
Get the Service Base URL from the Kubernetes Dashboard
It is also possible to get this information via the Kubernetes dashboard. Open the dashboard and click on ‘Nodes’ in the menubar on the left-side of the dashboard screen. Take note of the ‘InternalIP’ value in the ‘Addresses:’ key as shown below:
Next, click on the ‘Services’ in the menubar on the left-side of the dashboard screen and select the libappk8 Kubernetes Service. Take note of the ‘Internal endpoints’. The LoadBalancer-type Service is mapped from tcp/8080 to Node port tcp/32700. The base URL of the exposed libappk8 Kubernetes Service is https://192.168.64.2:32700.
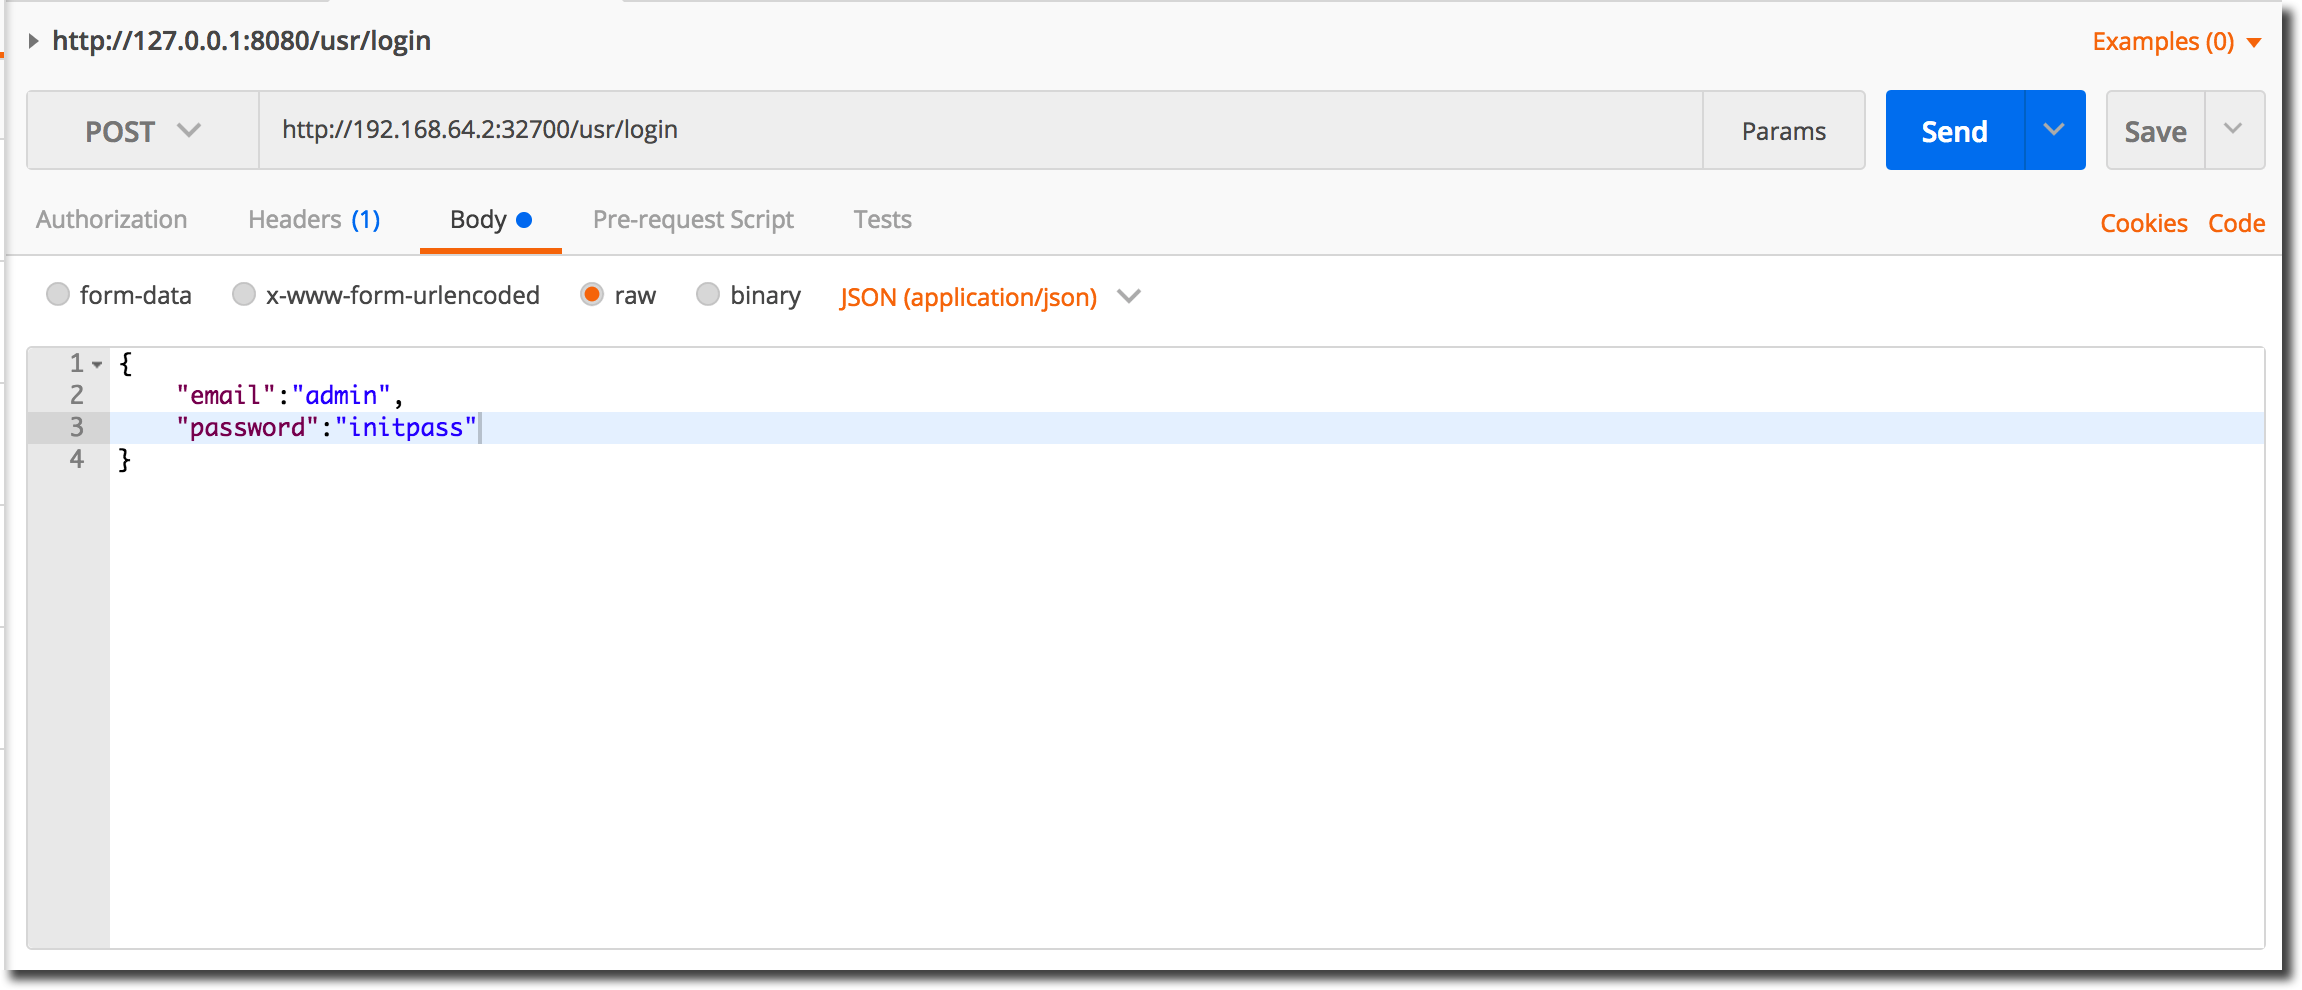
Login to the Load Balanced Kubernetes Service
Launch Postman or your favorite RESTful service testing tool and specify a target URL of: http://192.168.64.2:32700/usr/login making sure to select the http POST method. Maintain the request body to provide a user-id and password as shown in the following JSON snippet. Typically the user-id for a Jiffy application is an email address, but an exception is made for the default administration user definition.
    {
        "email": "admin",
        "password": "initpass"
    }
When you have finished and your Postman session (or other test utility) looks like the following image, click the ‘Send’ button to post your login request to the running application.
If all goes well, you will get a http response code of 200 (status ok), and a block of JSON with a single 'token' tag containing a jumble of letters and numbers. This is the JWT that will be used to validate the 'admin' user's authorization to access the 'Library' and 'Book' entity service end-points. If you want to read more about JWT's, [jwt.io](https://jwt.io) is a good place to start, or you can refer to the [Access Control](/jiffy/accesscontrol/index.html) section of this document set. 
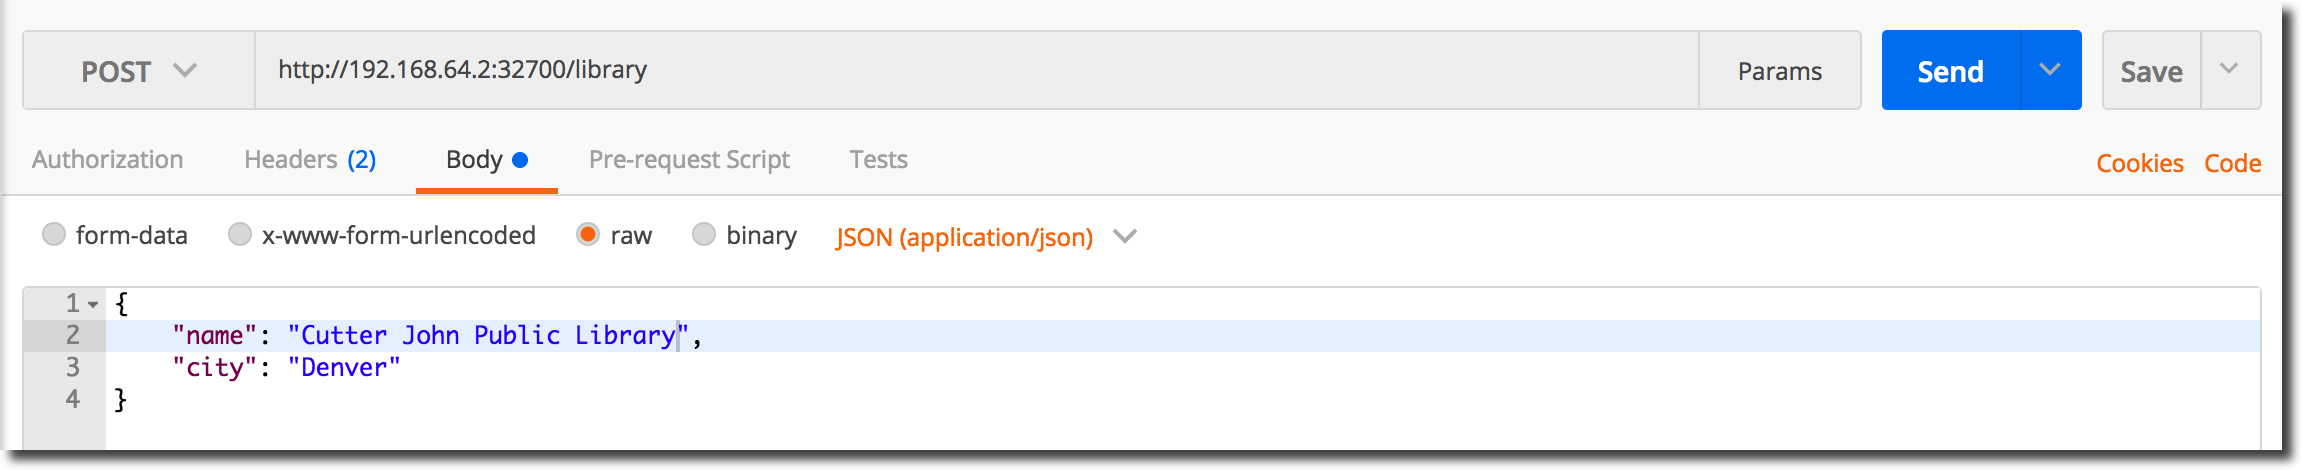
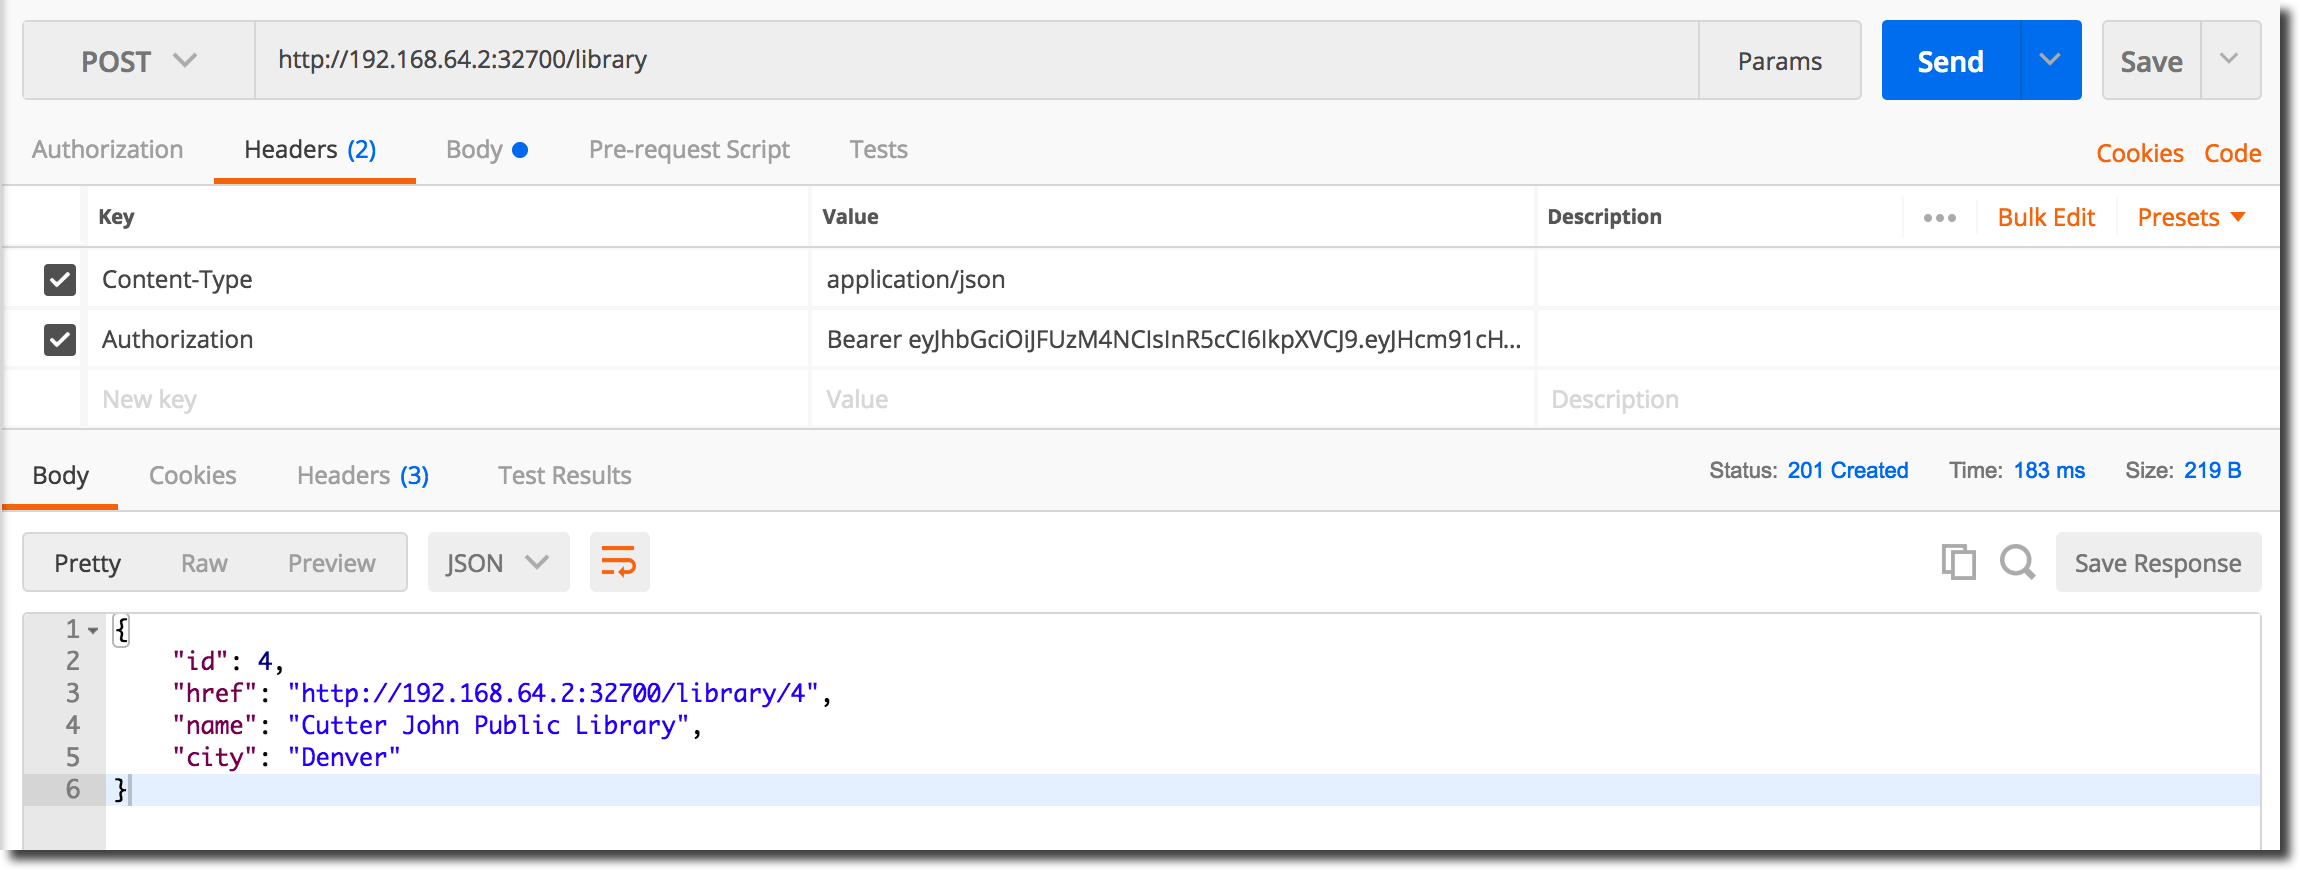
Create a Library
We will create a new ‘Library’ entity. Configure your test-tool to POST to the ‘library’ service as shown in the following image:
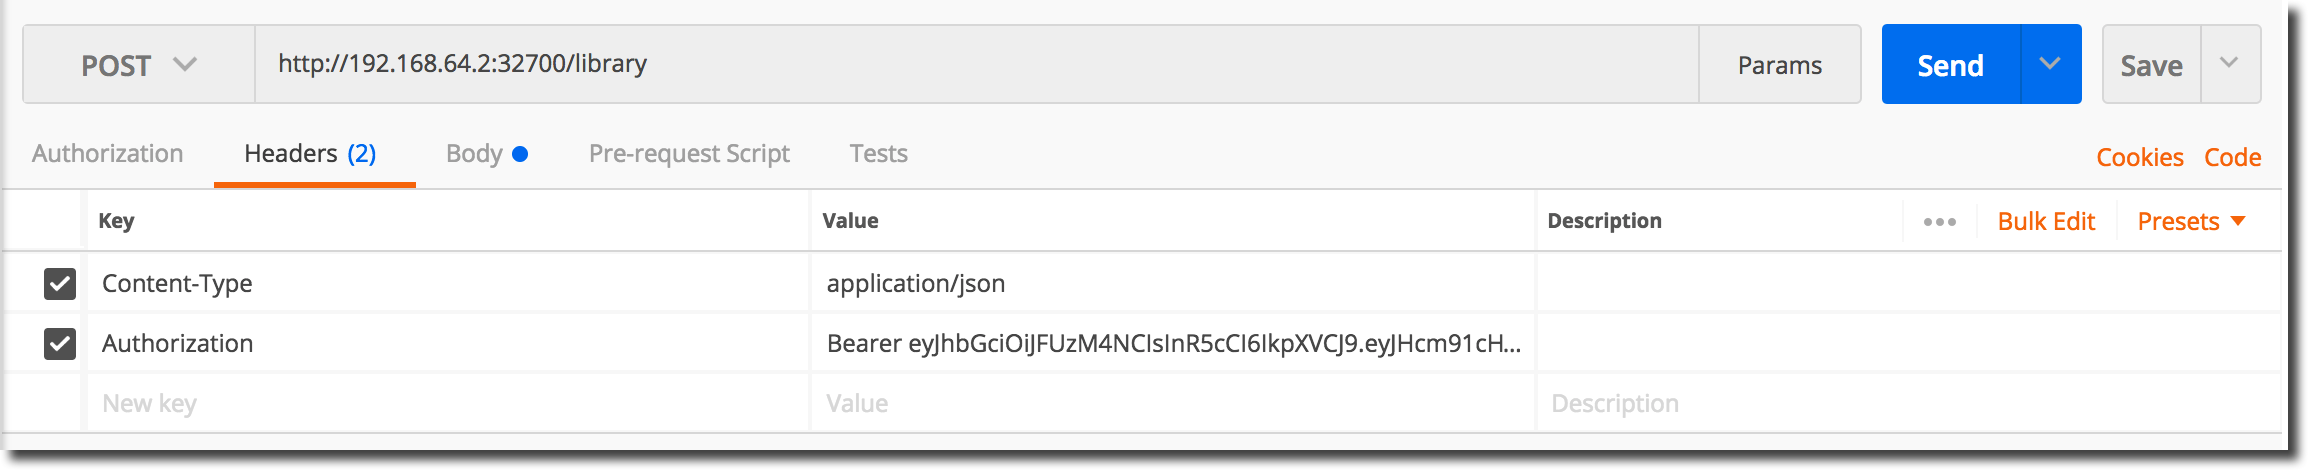
Copy the JWT from the login session and paste it into the new POST request’s Authorization header field as shown below and then submit the request to the application.
Following submission, a new ‘Library’ entity should have been created:
Login to a Pod
It is possible for more than one container to be running in a Pod, but jiffy application containers are typically are deployed in their own Pod as shown in the preceding example. It is possible to login to a jiffy container running in a Pod using the kubectl exec command.
First, identify the Pod of interest. We will select a Pod at random from the list provided by kubectl get pods:
NAME                        READY     STATUS    RESTARTS   AGE
libappk8-687c7484cb-5nwxq   1/1       Running   0          1d
libappk8-687c7484cb-8hmtw   1/1       Running   0          1d
libappk8-687c7484cb-hnksv   1/1       Running   0          1d
libappk8-687c7484cb-pbntc   1/1       Running   0          1d
Select the first jiffy Pod in your list and run the following command to login to the Pod with a /bin/sh session:
kubectl exec -it libappk8-687c7484cb-5nwxq -- /bin/sh
You should be logged into the Pod (container) as root. Run a few commands to verify that the jiffy application is running etc:
/ # uname -a
Linux libappk8-687c7484cb-5nwxq 4.9.64 #1 SMP Fri Mar 30 21:27:22 UTC 2018 x86_64 Linux
/ #
/ #
/ # ps -a
PID   USER     TIME   COMMAND
    1 root      11:23 /main -dev
   20 root       0:00 /bin/sh
   33 root       0:00 ps -a
/ #
/ #
/ # ifconfig
eth0      Link encap:Ethernet  HWaddr 02:42:AC:11:00:04
          inet addr:172.17.0.4  Bcast:172.17.255.255  Mask:255.255.0.0
          UP BROADCAST RUNNING MULTICAST  MTU:1500  Metric:1
          RX packets:4388710 errors:0 dropped:0 overruns:0 frame:0
          TX packets:4388283 errors:0 dropped:0 overruns:0 carrier:0
          collisions:0 txqueuelen:0
          RX bytes:851735396 (812.2 MiB)  TX bytes:852858453 (813.3 MiB)

lo        Link encap:Local Loopback
          inet addr:127.0.0.1  Mask:255.0.0.0
          UP LOOPBACK RUNNING  MTU:65536  Metric:1
          RX packets:1433477 errors:0 dropped:0 overruns:0 frame:0
          TX packets:1433477 errors:0 dropped:0 overruns:0 carrier:0
          collisions:0 txqueuelen:1
          RX bytes:263340481 (251.1 MiB)  TX bytes:263340481 (251.1 MiB)

/ #
Create another ‘Library’ entity using the ‘Create a Library’ steps and then request a list of Library entities using the GET ../librarys end-point:

Create a Book
Next, we will create a ‘Book’ entity and allocate it to ‘Library’ 1. Configure your test-tool to POST to the ‘book’ service as shown in the following image:

Following the submission, a new ‘Book’ entity should have been created:

Create a few more ‘Book’ entities using the ‘Create a Book’ steps and allocate them to your ‘Library’ entities. When you have finished, request a list of ‘Book’ entities using the GET ../books end-point:

Library toBooks
Based on the ‘hasMany’ relationship between the ‘Library’ and ‘Book’ entity’s, we can get the number of ‘Book’ entities belonging to ‘Library’ 1 as follows:

Remove the $count suffix from the URL to get the complete list of Book entities belonging to ‘Library’ 1:

Book toLibrary
A reciprocal ‘belongsTo’ relationship exists between the ‘Book’ and ‘Library’ entity definitions. Select a ‘Book’ entity and verify that the ‘belongsTo’ relationship works as expected:

Check the list of filters and commands along with the Library and Book models to see what can be appended to the the service end-points. Try some things out.